Using Multiple Software Collections
Software Collections are never versions of system wide packages used typically on Red Hat Enterprise Linux. They are installed together with the system-wide versions and can be used to develop applications without affecting the system tools.
If you need to use a software collection then enable it like so:
scl enable rh-ruby22 /bin/bash
You can enable a second (and third, etc) software collection by executing scl
again:
scl enable nodejs010 /bin/bash
After executing the above two commands I have:
$ which ruby
/opt/rh/rh-ruby22/root/usr/bin/ruby
$ which node
/opt/rh/nodejs010/root/usr/bin/node
Now I can develop an application using Ruby 2.2 and Node.js 0.10.
There are comments.
Insert Key on MacBook Keyboard
For some reason my terminal doesn't always accept Ctrl+V for paste. Instead it needs the Shift+Ins key combo. On the MacBook Air keyboard the Ins key is simulated by pressing Fn+Return together. So the paste combo becomes Shift+Fn+Return!
There are comments.
Tip: Running DNF Plugins from git
This is mostly for self reference because it is not currently documented
in the code. To use dnf plugins from a local git checkout modify your
/etc/dnf/dnf.conf and add the following line under the [main] section:
pluginpath=/path/to/dnf-plugins-core/plugins
There are comments.
Tip: Try F10 When Editing grub2 Menu in EFI Mode
When editing the grub2 menu (especially in EFI mode) it tells you to press Ctrl-x to save your changes and continue the boot process. However this doesn't work on my MacBook Air, see RHBZ #1253637, and maybe some other platforms. If this is the case try pressing F10 instead. It works for me!
There are comments.
How to Enable backspace Key to Navigate Back in Firefox
Open about:config and set browser.backspace_action to 0.
For more information see here.
There are comments.
Tip: Linux-IO default LUN is 0 instead of 1
I've been testing iBFT in KVM which worked quite well with a RHEL 6 iSCSI target and failed miserably when I switched to RHEL 7 iSCSI target.
iPXE> dhcp net0
DHCP (net0 52:54:00:12:34:56)... ok
iPXE> set keep-san 1
iPXE> sanboot iscsi:10.0.0.1:::1:iqn.2015-05.com.example:target1
Could not open SAN device: Input/output error (http://ipxe.org/1d704539)
iPXE>
The error page says
Note that the default configuration when Linux is the target is for the disk to be LUN 1.
Well this is not true for Linux-IO (targetcli). The default LUN is 0!
iPXE> sanboot iscsi:10.0.0.1:::0:iqn.2015-05.com.example:target1
Registered SAN device 0x80
Booting from SAN device 0x80
Kudos to Bruno Goncalves from Red Hat in helping me debug this issue!
There are comments.
Tip: Collecting Emails - Webhooks for UserVoice and WordPress.com
In my practice I like to use webhooks and integrate auxiliary services with my internal processes or businesses. One of these is the collection of emails. In this short article I'll show you an example of how to collect email addresses from the comments of a WordPress.com blog and the UserVoice feedback/ticketing system.
WordPress.com
For your WordPress.com blog from the Admin Dashboard navigate to
Settings -> Webhooks and add a new webhook with action comment_post
and fields comment_author, comment_author_email. A simple
Django view that handles the input is shown below.
@csrf_exempt
def hook_wp_comment_post(request):
    if not request.POST:
        return HttpResponse("Not a POST\n", content_type='text/plain', status=403)

    hook = request.POST.get("hook", "")

    if hook != "comment_post":
        return HttpResponse("Go away\n", content_type='text/plain', status=403)

    name = request.POST.get("comment_author", "")
    first_name = name.split(' ')[0]
    last_name = ' '.join(name.split(' ')[1:])

    details = {
        'first_name' : first_name,
        'last_name' : last_name,
        'email' : request.POST.get("comment_author_email", ""),
    }

    store_user_details(details)

    return HttpResponse("OK\n", content_type='text/plain', status=200)
UserVoice
For UserVoice navigate to Admin Dashboard -> Settings -> Integrations -> Service Hooks and add a custom web hook for the New Ticket notification. Then use a sample code like that:
@csrf_exempt
def hook_uservoice_new_ticket(request):
    if not request.POST:
        return HttpResponse("Not a POST\n", content_type='text/plain', status=403)

    data = request.POST.get("data", "")
    event = request.POST.get("event", "")

    if event != "new_ticket":
        return HttpResponse("Go away\n", content_type='text/plain', status=403)

    data = json.loads(data)

    details = {
        'email' : data['ticket']['contact']['email'],
    }

    store_user_details(details)

    return HttpResponse("OK\n", content_type='text/plain', status=200)
store_user_details() is a function which handles the email/name received in the webhook,
possibly adding them to a database or anything else.
I find webhooks extremely easy to setup and develop and used them whenever they are supported by the service provider. What other services do you use webhooks for? Please share your story in the comments.
There are comments.
Tip: How to Build updates.img for Fedora
Anaconda the Fedora, CentOS and Red Hat Enterprise Linux installer has the
capability to incorporate
updates at runtime.
These updates are generally distributed as an updates.img file. Here is how
to easily build one from a working installation tree.
Instead of using the git sources to build an updates.img I prefer using the SRPM
from the tree which I am installing. This way the resulting updates image will be
more consistent with the anaconda version already available in the tree. And in theory
everything you need to build it should already be available as well.
UPDATE 2014-02-08: You can also build the updates.img from the git source tree
which is shown at the bottom of this article.
The following steps work for me on a Fedora 20 system.
-
Download the source RPM for anaconda from the tree and extract the sources to a working directory. Then;
cd anaconda-20.25.16-1 git init git add . git commit -m "initial import" git tag anaconda-20.25.16-1 -
The above steps will create a local git repository and tag the initial contents before modification. The tag is required later by the script which creates the updates image;
-
After making your changes commit them and from the top anaconda directory execute:
./scripts/makeupdates -t anaconda-20.25.16-1
You can also add RPM contents to the updates.img but you need to download the packages first:
yumdownloader python-coverage python-setuptools

./scripts/makeupdates -t anaconda-20.25.16-1 -a ~/python-coverage-3.7-1.fc20.x86_64.rpm -a ~/python-setuptools-1.4.2-1.fc20.noarch.rpm
BUILDDIR /home/atodorov/anaconda-20.25.16-1
Including anaconda
2 RPMs added manually:
python-setuptools-1.4.2-1.fc20.noarch.rpm
python-coverage-3.7-1.fc20.x86_64.rpm
cd /home/atodorov/anaconda-20.25.16-1/updates && rpm2cpio /home/atodorov/python-setuptools-1.4.2-1.fc20.noarch.rpm | cpio -dium
3534 blocks
cd /home/atodorov/anaconda-20.25.16-1/updates && rpm2cpio /home/atodorov/python-coverage-3.7-1.fc20.x86_64.rpm | cpio -dium
1214 blocks
<stdin> to <stdout> 4831 blocks

updates.img ready
In the above example I have only modified the top level anaconda file (/usr/sbin/anaconda
inside the installation environment) experimenting with
python-coverage integration.
You are done! Make the updates.img available to Anaconda and start using it!
UPDATE 2014-02-08: If you prefer working with the anaconda source tree here's how to do it:
git clone git://git.fedorahosted.org/git/anaconda.git
cd anaconda/
git checkout anaconda-20.25.16-1 -b my_feature-branch

... make changes ...

git commit -a -m "Fixed something"

./scripts/makeupdates -t anaconda-20.25.16-1
There are comments.
AWS Tip: Shrinking EBS Root Volume Size
Amazon's Elastic Block Store volumes are easy to use and expand but notoriously hard to shrink once their size has grown. Here is my tip for shrinking EBS size and saving some money from over-provisioned storage. I'm assuming that you want to shrink the root volume which is on EBS.
- Write down the block device name for the root volume (/dev/sda1) - from AWS console: Instances; Select instance; Look at Details tab; See Root device or Block devices;
- Write down the availability zone of your instance - from AWS console: Instances; column Availability Zone;
- Stop instance;
- Create snapshot of the root volume;
- From the snapshot, create a second volume, in the same availability zone as your instance (you will have to attach it later). This will be your pristine source;
- Create new empty EBS volume (not based on a snapshot), with smaller size,
in the same availability zone - from AWS console: Volumes; Create Volume;
Snapshot == No Snapshot; IMPORTANT - size should be large enough to hold
all the files from the source file system (try
df -hon the source first); - Attach both volumes to instance while taking note of the block devices names you assign for them in the AWS console;
For example: In my case /dev/sdc1 is the source snapshot and /dev/sdd1 is the
empty target.
- Start instance;
- Optionally check the source file system with
e2fsck -f /dev/sdc1; - Create a file system for the empty volume -
mkfs.ext4 /dev/sdd1; - Mount volumes at
/sourceand/targetrespectively; - Now sync the files:
rsync -aHAXxSP /source/ /target. Note the missing slash (/) after/target. If you add it you will end up with files inside/target/source/which you don't want; - Quickly verify the new directory structure with
ls -l /target; - Unmount
/target; - Optionally check the new file system for consistency
e2fsck -f /dev/sdd1; - IMPORTANT - check how
/boot/grub/grub.confspecifies the root volume - by UUID, by LABEL, by device name, etc. You will have to duplicate the same for the new smaller volume or update/target/boot/grub/grub.confto match the new volume. Check/target/etc/fstabas well!
In my case I had to e2label /dev/sdd1 / because both grub.conf and fstab were
using the device label.
- Shutdown the instance;
- Detach all volumes;
- IMPORTANT - attach the new smaller volume to the instance using the same block device
name from the first step (e.g.
/dev/sda1); - Start the instance and verify it is working correctly;
- DELETE auxiliary volumes and snapshots so they don't take space and accumulate costs!
There are comments.
Tip: Cut Leading or Trailing Fields From Strings in Bash
Today I was looking for a command sequence to cut a string in two by predefined
delimiter (e.g. like cut does). I wanted to get the last field only and all
fields but the last as separate variables.
The proposed solutions I've found suggested using awk but I don't like it.
Here's a simple solution using cut and rev which can extract arbitrary
field counts from the end of the string.
$ echo 'buildvm-08.phx2.fedoraproject.org' | rev | cut -f1 -d. | rev
org
$ echo 'buildvm-08.phx2.fedoraproject.org' | rev | cut -f-2 -d. | rev
fedoraproject.org
$ echo 'buildvm-08.phx2.fedoraproject.org' | rev | cut -f-3 -d. | rev
phx2.fedoraproject.org
$ echo 'buildvm-08.phx2.fedoraproject.org' | rev | cut -f2- -d. | rev
buildvm-08.phx2.fedoraproject
$ echo 'buildvm-08.phx2.fedoraproject.org' | rev | cut -f3- -d. | rev
buildvm-08.phx2
$ echo 'buildvm-08.phx2.fedoraproject.org' | rev | cut -f4- -d. | rev
buildvm-08
The magic here is done by rev which reverses the order of characters in every
line. It comes with the util-linux-ng package.
Note to Self: util-linux-ng appears to contain more useful commands which I wasn't aware of. Need to RTFM a little bit.
There are comments.
Tip: Extending Btrfs Filesystem for Fedora Virtual Machine
I was testing Fedora 20 inside a KVM guest this week when the disk space run out. The system was configured to use Btrfs filesystem and this is how to extend it.
First you have to extend the underlying guest storage. On the host I'm using LVM so this is a no brainer:
# pvs
  PV                                                    VG              Fmt  Attr PSize   PFree
  /dev/mapper/luks-f3f6cea1-baba-4aaf-bca8-33a0ec540369 vg_redbull_mini lvm2 a--  289,11g 134,11g

# lvs
  LV            VG              Attr      LSize   Pool Origin Data%  Move Log Cpy%Sync Convert
  vm_fedora     vg_redbull_mini -wi-ao---  15,00g

# lvextend -L +5G /dev/mapper/vg_redbull_mini-vm_fedora
  Extending logical volume vm_fedora to 20,00 GiB
  Logical volume vm_fedora successfully resized

# lvs
  LV            VG              Attr      LSize   Pool Origin Data%  Move Log Cpy%Sync Convert
  vm_fedora     vg_redbull_mini -wi-ao---  20,00g

# pvs
  PV                                                    VG              Fmt  Attr PSize   PFree
  /dev/mapper/luks-f3f6cea1-baba-4aaf-bca8-33a0ec540369 vg_redbull_mini lvm2 a--  289,11g 129,11g
On the VM we have a default Btrfs layout:
# blkid
/dev/vda1: UUID="410ee563-e701-42ff-9d5f-5805dd103e35" TYPE="ext4" PARTUUID="0000330f-01"
/dev/vda2: UUID="f4addad4-a0fc-482e-ad5a-240864b76f09" TYPE="swap" PARTUUID="0000330f-02"
/dev/vda3: LABEL="fedora" UUID="f0b589ce-061c-4ac3-826e-7f3f8c8a6d30" UUID_SUB="11aa8414-3ce1-4fe7-a506-9a4f91ba5c30" TYPE="btrfs" PARTUUID="0000330f-03"

# df -h
Filesystem      Size  Used Avail Use% Mounted on
/dev/vda3        13G   11G  1.4G  89% /
devtmpfs        996M     0  996M   0% /dev
tmpfs          1002M   80K 1002M   1% /dev/shm
tmpfs          1002M  668K 1002M   1% /run
tmpfs          1002M     0 1002M   0% /sys/fs/cgroup
tmpfs          1002M   16K 1002M   1% /tmp
/dev/vda3        13G   11G  1.4G  89% /home
/dev/vda1       477M   72M  376M  17% /boot
Now power-off (not reboot) and power-on the VM guest so that it sees the new size of the underlying storage. See the fdisk header (line 9 below), vda is now 20GiB!
Before extending the filesystem you have to extend the underlying disk partition! This is the trickiest part. Using fdisk or parted you have to delete the partition and add it again. Make sure to use the SAME starting sector for the new partition (line 33)!
1 2 3 4 5 6 7 8 9 10 11 12 13 14 15 16 17 18 19 20 21 22 23 24 25 26 27 28 29 30 31 32 33 34 35 36 37 38 39 40 41 42 43 44 45 46 47 48 49 50 51 52 53 54 55 56 57 58 59 60 61 62 | |
See lines 36 and 49 above. The new partition has a greater size. After reboot just resize the filesystem and verify the new space has been added
# btrfs filesystem resize max /
Resize '/' of 'max'

# df -h
Filesystem      Size  Used Avail Use% Mounted on
/dev/vda3        18G   11G  6.4G  63% /
devtmpfs        996M     0  996M   0% /dev
tmpfs          1002M   80K 1002M   1% /dev/shm
tmpfs          1002M  660K 1002M   1% /run
tmpfs          1002M     0 1002M   0% /sys/fs/cgroup
tmpfs          1002M   16K 1002M   1% /tmp
/dev/vda3        18G   11G  6.4G  63% /home
/dev/vda1       477M   72M  376M  17% /boot
This is it, more disk space available for the virtual machine. Let me know how it works for you.
There are comments.
Tip: Installing Missing debuginfo Packages for ABRT

Every once in a while ABRT will tell you that reporting is disabled because backtrace is unusable. What it means is that it can't read some of the debugging symbols and the most likely reason for that is debuginfo packages are missing.
To install them first locate the directory containing the files for that particular
crash. Use the executable file to find out if you are looking into the correct
directory. Then use this one liner to install the missing debuginfo packages.
# pwd
/var/tmp/abrt/ccpp-2013-10-10-15:55:18-15533
# cat backtrace | grep lib | tr -s ' ' | cut -f4 -d' ' | sort | uniq | grep "/" | xargs rpm -qf --qf "%{name}\n" | xargs debuginfo-install -y
There are comments.
Tip: How to Find Your Red Hat Account Number
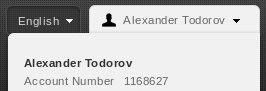
One thing you need to know when ordering Red Hat subscriptions is your account number. It is available in the drop down menu at the top right corner after you login at https://access.redhat.com.
New accounts don't have an account number. It will be generated after the first subscription activation.
If you need to know more about Red Hat's ordering process just ask me!
There are comments.
SSH from Linux to BlackBerry Z10
You can SSH into a BlackBerry Z10 device even on Linux. I'm using Red Hat Enterprise Linux 6 and here is how to establish the connection.
1) Enable USB networking between your Linux desktop and the Z10;
2) Install the Momentics IDE. You need it to create debug tokens and to start the SSH daemon on the device;
3) Obtain signing keys and create a debug token by following the wizard in the IDE. I just started a new project and followed the instructions;
4) Install debug token on device using the IDE. From Window -> Preferences select
Blackberry -> Signing. Just create and deploy the debug token on the device. Mine was
automatically discovered so I just had to follow the prompts;
5) Reboot and re-enable development mode (I'm not sure if this was necessary);
6) Generate a 4096 bit key for SSH. Smaller keys won't work. You can use your current key if it is 4096 bit;
$ ssh-keygen -t rsa -b 4096
Generating public/private rsa key pair.
Enter file in which to save the key (/home/atodorov/.ssh/id_rsa): /home/atodorov/.rim/testKey_4096_rsa
/home/atodorov/.rim/testKey_4096_rsa already exists.
Overwrite (y/n)? y
Enter passphrase (empty for no passphrase):
Enter same passphrase again:
Your identification has been saved in /home/atodorov/.rim/testKey_4096_rsa.
Your public key has been saved in /home/atodorov/.rim/testKey_4096_rsa.pub.
The key fingerprint is:
77:73:55:03:e1:fc:5b:df:a6:e9:2c:b4:d4:1e:0c:b2 atodorov@redbull.mini
The key's randomart image is:
+--[ RSA 4096]----+
|             oo..|
|            o   o|
|             o  .|
|          . . .. |
|        S .oo+...|
|         .E.oo+ =|
|           o o o+|
|            o..+ |
|             o=  |
+-----------------+
7) Update key permissions, since ssh complains:
$ chmod 600 ~/.rim/testKey_4096_rsa.pub
8) By default SSH is not listening on your BlackBerry. Use the blackberry-connect
command to start the SSH daemon on the device. It will upload your public SSH key
to the device and start the SSH daemon on the other side. password is your device
password;
$ pwd
/home/atodorov/bbndk/host_10_1_0_231/linux/x86/usr/bin

$ ./blackberry-connect 169.254.0.1 -password 123456 -sshPublicKey ~/.rim/testKey_4096_rsa.pub
Info: Connecting to target 169.254.0.1:4455
Info: Authenticating with target 169.254.0.1:4455
Info: Encryption parameters verified
Info: Authenticating with target credentials.
Info: Successfully authenticated with target credentials.
Info: Sending ssh key to target 169.254.0.1:4455
Info: ssh key successfully transferred.
Info: Successfully connected. This application must remain running in order to use debug tools. Exiting the application will terminate this connection.
9) Check if SSH is running on the device
$ nmap 169.254.0.1

Starting Nmap 5.51 ( http://nmap.org ) at 2013-07-18 10:19 EEST
Stats: 0:00:01 elapsed; 0 hosts completed (1 up), 1 undergoing Connect Scan
Connect Scan Timing: About 14.30% done; ETC: 10:20 (0:00:06 remaining)
Nmap scan report for 169.254.0.1
Host is up (0.00097s latency).
Not shown: 991 closed ports
PORT     STATE SERVICE
22/tcp   open  ssh
80/tcp   open  http
139/tcp  open  netbios-ssn
443/tcp  open  https
445/tcp  open  microsoft-ds
1111/tcp open  lmsocialserver
5555/tcp open  freeciv
8000/tcp open  http-alt
8443/tcp open  https-alt

Nmap done: 1 IP address (1 host up) scanned in 12.47 seconds
10) Use SSH with the specified key to connect to the Z10. Username is devuser.
Here's a simple session:
$ ssh -i ~/.rim/testKey_4096_rsa devuser@169.254.0.1
$
$ pwd
/accounts/devuser
$ uname -a
QNX atodorovZ10 8.0.0 2013/05/02-08:42:48EDT OMAP4470_ES1.0_HS_London_Rev:08 armle
$ date
Fri Jul 19 23:39:19 EEST 2013
$ ifconfig
lo0: flags=8049<UP,LOOPBACK,RUNNING,MULTICAST> mtu 33192
    inet 127.0.0.1 netmask 0xff000000
    inet6 ::1 prefixlen 128
    inet6 fe80::1%lo0 prefixlen 64 scopeid 0x1
tiw_drv0: flags=8c02<BROADCAST,OACTIVE,SIMPLEX,MULTICAST> mtu 1500
    address: 1c:69:a5:d0:10:cd
tiw_sta0: flags=40008c43<UP,BROADCAST,RUNNING,OACTIVE,SIMPLEX,MULTICAST,ACCEPTRTADV> mtu 1500
    address: 1c:69:a5:d0:10:cd
    inet 192.168.0.100 netmask 0xffffff00 broadcast 192.168.0.255
    inet6 fe80::1e69:a5ff:fed0:10cd%tiw_sta0 prefixlen 64 scopeid 0x12
tiw_p2pdev0: flags=8c02<BROADCAST,OACTIVE,SIMPLEX,MULTICAST> mtu 1500
    address: 1c:69:a5:d0:10:cd
tiw_p2pgrp0: flags=8c02<BROADCAST,OACTIVE,SIMPLEX,MULTICAST> mtu 1500
    address: 1c:69:a5:d0:10:cd
tiw_ibss0: flags=8c02<BROADCAST,OACTIVE,SIMPLEX,MULTICAST> mtu 1500
    address: 1c:69:a5:d0:10:cd
pflog0: flags=0 mtu 33192
lo2: flags=8048<LOOPBACK,RUNNING,MULTICAST> mtu 33192
cellular0: flags=8810<POINTOPOINT,SIMPLEX,MULTICAST> mtu 1500
cellular1: flags=8810<POINTOPOINT,SIMPLEX,MULTICAST> mtu 1500
cellular2: flags=8810<POINTOPOINT,SIMPLEX,MULTICAST> mtu 1500
cellular3: flags=8810<POINTOPOINT,SIMPLEX,MULTICAST> mtu 1500
cellular4: flags=8810<POINTOPOINT,SIMPLEX,MULTICAST> mtu 1500
bptp0: flags=8043<UP,BROADCAST,RUNNING,MULTICAST> mtu 1356
    inet6 fe80::1e69:a5ff:fed0:10cd%bptp0 prefixlen 64 scopeid 0x2d
    inet6 fd02:42ac:77b2:d543:c158:fabb:6276:80e6 prefixlen 8
ecm0: flags=8a43<UP,BROADCAST,RUNNING,ALLMULTI,SIMPLEX,MULTICAST> mtu 1500
    address: 1e:69:a5:d0:10:cd
    inet 169.254.0.1 netmask 0xfffffffc broadcast 169.254.0.3
    inet6 fe80::1c69:a5ff:fed0:10cd%ecm0 prefixlen 64 scopeid 0x2e
IMPORTANT: you can also use the WiFi address of the device to pass to
backberry-connect and ssh. It works for me.
I'm starting to explore the dark world of QNX in the next couple of days and will keep you posted! Until then - happy hacking.
There are comments.
Tip: How To Enable USB Networking Between BlackBerry Z10 and Red Hat Enterprise Linux 6
On Linux there is a feature called USB networking which provides you with a TCP/IP connection to another device connected via USB cable. Here is how to connect your BlackBerry Z10 to your Linux laptop over USB. I use Red Hat Enterprise Linux but should work out of the box for other distros too.
Connect the Z10 to your laptop:
    $ lsusb
    Bus 001 Device 005: ID 0fca:8020 Research In Motion, Ltd. Blackberry Playbook (CD-Rom mode)
By default many USB devices will present a virtual CD-ROM with drivers for Windows.
This is the case here too. To change it go to Settings - Storage and Access and
set USB Connection to Connect to Mac!
If necessary plug out and back in the Z10.
    $ lsusb
    Bus 001 Device 007: ID 0fca:8013 Research In Motion, Ltd.

    $ ifconfig
    usb0      Link encap:Ethernet  HWaddr 1E:69:A5:D0:11:0A
              inet addr:169.254.0.2  Bcast:169.254.0.3  Mask:255.255.255.252
              inet6 addr: fe80::1c69:a5ff:fed0:110a/64 Scope:Link
              UP BROADCAST RUNNING MULTICAST  MTU:1500  Metric:1
              RX packets:49 errors:0 dropped:0 overruns:0 frame:0
              TX packets:8 errors:0 dropped:0 overruns:0 carrier:0
              collisions:0 txqueuelen:1000
              RX bytes:16002 (15.6 KiB)  TX bytes:1152 (1.1 KiB)
IMPORTANT: In the same Storage and Access screen scroll down to
USB Mass Storage and turn it Off. If you don't do this your Z10 will appear
as USB flash drive and no USB networking will be available. This is how it looks:
    $ lsusb
    Bus 001 Device 008: ID 0fca:8014 Research In Motion, Ltd.
IMPORTANT: If you need your Z10 storage accessible together with USB networking
you can try accessing the device over Wi-Fi.
Configure it from the same Storage and Access screen. Then your device will be
available through Samba on its wireless IP address. I've tried it, works for me!
You don't need anything else to get this working. All set!
My intention is to use either USB networking or Wi-Fi to connect to the Z10 shell and explore it in more details.
There are comments.
Tip: Setting Secure ENV variables on Red Hat OpenShift
OpenShift is still missing the client side tools to set environment variables without exposing the values in source code but there is a way to do it. Here is how.
First ssh into your application and navigate to the $OPENSHIFT_DATA_DIR.
Create a file to define your environment.
$ rhc ssh -a difio
Password: ***

[difio-otb.rhcloud.com 51d32a854382ecf7a9000116]\> cd $OPENSHIFT_DATA_DIR
[difio-otb.rhcloud.com data]\> vi myenv.sh
[difio-otb.rhcloud.com data]\> cat myenv.sh
#!/bin/bash
export MYENV="hello"

[difio-otb.rhcloud.com data]\> chmod a+x myenv.sh
[difio-otb.rhcloud.com data]\> exit
Connection to difio-otb.rhcloud.com closed.
Now modify your code and git push to OpenShift. Then ssh into the app once again to verify that your configuration is still in place.
[atodorov@redbull difio]$ rhc ssh -a difio
Password: ***

[difio-otb.rhcloud.com 51d32a854382ecf7a9000116]\> cd $OPENSHIFT_DATA_DIR
[difio-otb.rhcloud.com data]\> ls -l
total 4
-rwxr-xr-x. 1 51d32a854382ecf7a9000116 51d32a854382ecf7a9000116 34  8 jul 14,33 myenv.sh
[difio-otb.rhcloud.com data]\>
Use the defined variables as you wish.
There are comments.
Tip: Caching Large Objects for Celery and Amazon SQS
Some time ago a guy called Matt asked about passing large objects through their messaging queue. They were switching from RabbitMQ to Amazon SQS which has a limit of 64K total message size.
Recently I've made some changes in Difio which require passing larger objects as parameters to a Celery task. Since Difio is also using SQS I faced the same problem. Here is the solution using a cache back-end:
from celery.task import task
from django.core import cache as cache_module

def some_method():
    ... skip ...

    task_cache = cache_module.get_cache('taskq')
    task_cache.set(uuid, data, 3600)

    handle_data.delay(uuid)

    ... skip ...

@task
def handle_data(uuid):
    task_cache = cache_module.get_cache('taskq')
    data = task_cache.get(uuid)

    if data is None:
        return

    ... do stuff ...
Objects are persisted in a secondary cache back-end, not the default one, to avoid
accidental destruction. uuid parameter is a string.
Although the objects passed are smaller than 64K I haven't seen any issues with this solution so far. Let me know if you are using something similar in your code and how it works for you.
There are comments.
Django Tips: Using Cache for Stateful HTTP
How do you keep state when working with a stateless protocol like HTTP? One possible answer is to use a cache back-end.
I'm working on an IVR application demo with Django and Twilio. The caller will make multiple choices using the phone keyboard. All of this needs to be put together and sent back to another server for processing. In my views I've added a simple cache get/set lines to preserve the selection.
Here's how it looks with actual application logic omitted
def incoming_call(request):
    call_sid = request.GET.get('CallSid', '')
    caller_id = request.GET.get('From', '')

    state = {'from' : caller_id}
    cache.set(call_sid, state)

    return render(request, 'step2.xml')

def step2(request):
    call_sid = request.GET.get('CallSid', '')
    selection = int(request.GET.get('Digits', 0))

    state = cache.get(call_sid, {})
    state['step2_selection'] = selection
    cache.set(call_sid, state)

    return render(request, 'final_step.xml')


def final_step(request):
    call_sid = request.GET.get('CallSid', '')
    selection = int(request.GET.get('Digits', 1))

    state = cache.get(call_sid, {})
    state['final_step_selection'] = selection

    Backend.process_user_selections(state)

    return render(request, 'thank_you.xml')
At each step Django will update the current state associated with this call and return
a TwiML XML response. CallSid is a handy unique
identifier provided by Twilio.
I am using the latest django-s3-cache version which properly works with directories. When going to production that will likely switch to Amazon ElastiCache.
There are comments.
Nibbler - W3C Validator on Steroids
I've recently found Nibbler which gives you a report scoring the website out of 10 for various important criteria including accessibility, SEO, social media and technology.
The produced report is very interesting. Here is the report for this blog. There are things I definitely need to work on!
For comparison SofiaValley scores far beyond this blog. It is stronger in marketing and popularity but apparently weaker on the technology section. This is interesting!
PS: sorry for not producing technical content lately. I've been very busy with some current projects however I've got lots of ideas and topics to blog about. I hope to make it up to speed in the next few weeks. -- Alex
There are comments.
Configuring Anonymous FTP Uploads On Red Hat Enterprise Linux 6
Install related packages and make configuration changes:
yum -y install vsftp policycoreutils-python
sed -i "s/#anon_upload_enable=YES/anon_upload_enable=YES/" /etc/vsftpd/vsftpd.conf
Configure writable directory for uploads:
mkdir /var/ftp/pub/upload
chgrp ftp /var/ftp/pub/upload
chmod 730 /var/ftp/pub/upload
Configure SELinux - this is MISSING from Red Hat's official docs:
setsebool -P allow_ftpd_anon_write=1
semanage fcontext -a -t public_content_rw_t '/var/ftp/pub/upload(/.*)'
chcon -t public_content_rw_t /var/ftp/pub/upload
Start the service:
chkconfig vsftpd on
service vsftpd start
There are comments.
Page 1 / 2