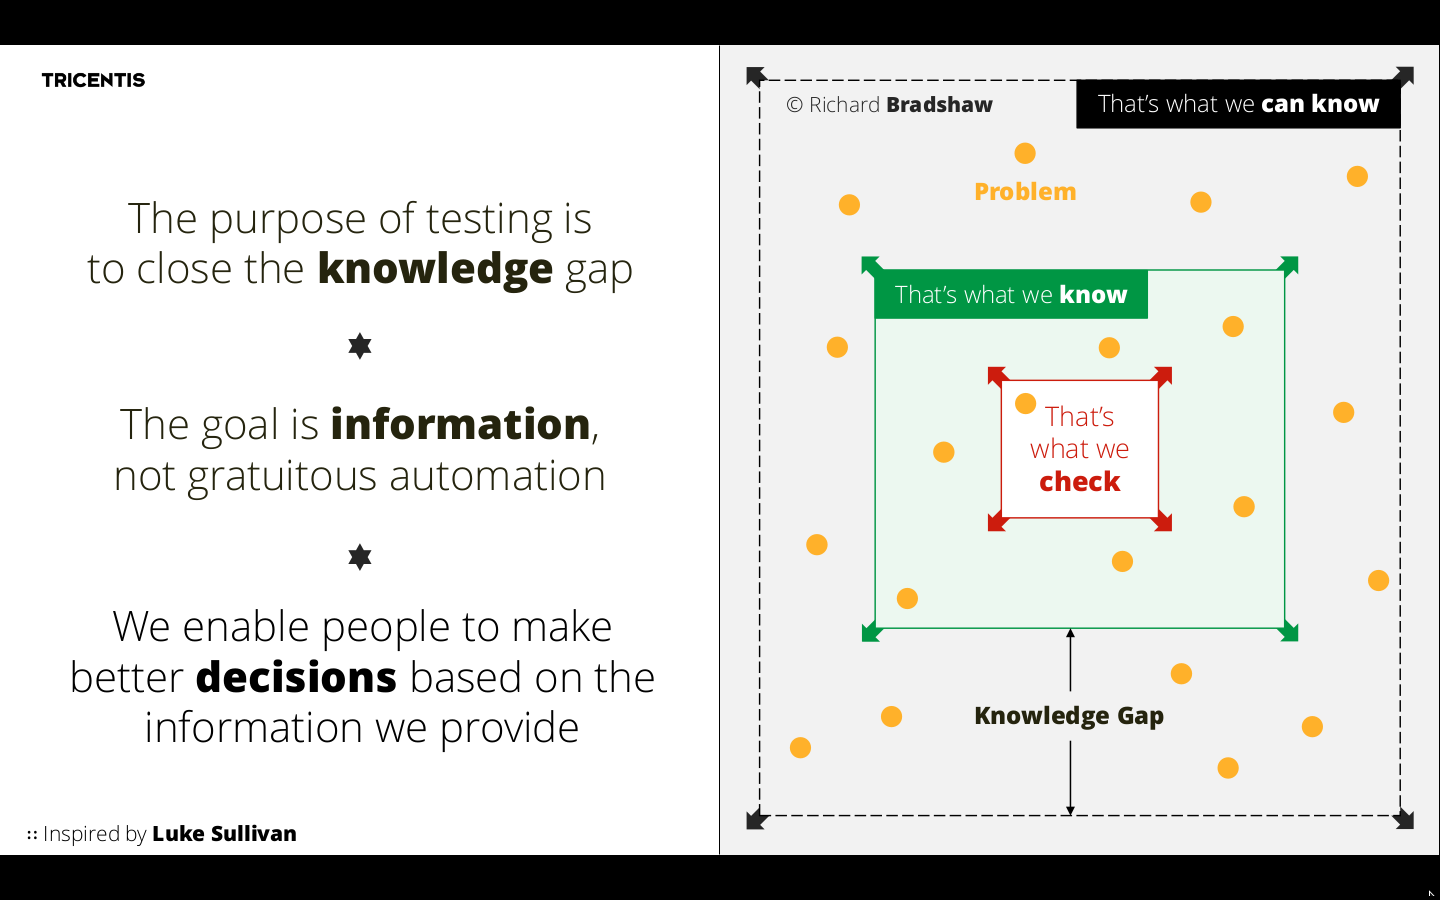
Comparing equivalent Python statements

While teaching one of my Python classes yesterday I noticed a conditional expression which can be written in several ways. All of these are equivalent in their behavior:
if os.path.isdir(path) is False:
    pass

if os.path.isdir(path) is not True:
    pass

if os.path.isdir(path) == False:
    pass

if os.path.isdir(path) != True:
    pass

if not os.path.isdir(path):
    pass
My preferred style of writing is the last one (not os.path.isdir()) because it
looks the most pythonic of all. However the 5 expressions are slightly different
behind the scenes so they must also have different speed of execution
(click operator for link to documentation):
is- identity operator, e.g. both arguments are the same object as determined by theid()function. In CPython that means both arguments point to the same address in memoryis not- yields the inverse truth value ofis, e.g. both arguments are not the same object (address) in memory==- equality operator, e.g. both arguments have the same value!=- non-equality operator, e.g. both arguments have different valuesnot- boolean operator
In my initial tweet I mentioned
that I think is False should be the fastest. Kiwi TCMS team
member Zahari countered with not to be the fastest
but didn't provide any reasoning!
My initial reasoning was as follows:
isis essentially comparing addresses in memory so it should be as fast as it gets==and!=should be roughly the same but they do need to "read" values from memory which would take additional time before the actual comparison of these valuesnotis a boolean operator but honestly I have no idea how it is implemented so I don't have any opinion as to its performance
Using the following performance test script we get the average of 100 repetitions from executing the conditional statement 1 million times:
#!/usr/bin/env python

import statistics
import timeit

t = timeit.Timer(
"""
if False:
#if not result:
#if result is False:
#if result is not True:
#if result != True:
#if result == False:
    pass
"""
,
"""
import os
result = os.path.isdir('/tmp')
"""
)

execution_times = t.repeat(repeat=100, number=1000000)
average_time = statistics.mean(execution_times)

print(average_time)
Note: in none of these variants the body of the if statement is executed so the results must be pretty close to how long it takes to calculate the conditional expression itself!
Results (ordered by speed of execution):
False _______ 0.009309015863109380- baselinenot result __ 0.011714859132189304- +25.84%is False ____ 0.018575656899483876- +99.54%is not True _ 0.018815848254598680- +102.1%!= True _____ 0.024881873669801280- +167.2%== False ____ 0.026119318689452484- +180.5%
Now these results weren't exactly what I was expecting. I thought not will come in
last but instead it came in first! Although is False came in second it is almost
twice as slow compared to baseline. Why is that ?
After digging around in CPython I found the following definition for comparison operators:
static PyObject * cmp_outcome(int op, PyObject *v, PyObject *w)
{
    int res = 0;
    switch (op) {
    case PyCmp_IS:
        res = (v == w);
        break;
    case PyCmp_IS_NOT:
        res = (v != w);
        break;
    /* ... skip PyCmp_IN, PyCmp_NOT_IN, PyCmp_EXC_MATCH ... */
    default:
        return PyObject_RichCompare(v, w, op);
    }
    v = res ? Py_True : Py_False;
    Py_INCREF(v);
    return v;
}
where PyObject_RichCompare is defined as follows (definition order reversed
in actual sources):
/* Perform a rich comparison with object result.  This wraps do_richcompare()
   with a check for NULL arguments and a recursion check. */
PyObject * PyObject_RichCompare(PyObject *v, PyObject *w, int op)
{
    PyObject *res;

    assert(Py_LT <= op && op <= Py_GE);
    if (v == NULL || w == NULL) {
        if (!PyErr_Occurred())
            PyErr_BadInternalCall();
        return NULL;
    }
    if (Py_EnterRecursiveCall(" in comparison"))
        return NULL;
    res = do_richcompare(v, w, op);
    Py_LeaveRecursiveCall();
    return res;
}

/* Perform a rich comparison, raising TypeError when the requested comparison
   operator is not supported. */
static PyObject * do_richcompare(PyObject *v, PyObject *w, int op)
{
    richcmpfunc f;
    PyObject *res;
    int checked_reverse_op = 0;

    if (v->ob_type != w->ob_type &&
        PyType_IsSubtype(w->ob_type, v->ob_type) &&
        (f = w->ob_type->tp_richcompare) != NULL) {
        checked_reverse_op = 1;
        res = (*f)(w, v, _Py_SwappedOp[op]);
        if (res != Py_NotImplemented)
            return res;
        Py_DECREF(res);
    }
    if ((f = v->ob_type->tp_richcompare) != NULL) {
        res = (*f)(v, w, op);
        if (res != Py_NotImplemented)
            return res;
        Py_DECREF(res);
    }
    if (!checked_reverse_op && (f = w->ob_type->tp_richcompare) != NULL) {
        res = (*f)(w, v, _Py_SwappedOp[op]);
        if (res != Py_NotImplemented)
            return res;
        Py_DECREF(res);
    }

    /**********************************************************************

        IMPORTANT: actual execution enters the next block because the bool
        type doesn't implement it's own `tp_richcompare` function, see:
        Objects/boolobject.c PyBool_Type (near the bottom of that file)

    ***********************************************************************/

    /* If neither object implements it, provide a sensible default
       for == and !=, but raise an exception for ordering. */
    switch (op) {
    case Py_EQ:
        res = (v == w) ? Py_True : Py_False;
        break;
    case Py_NE:
        res = (v != w) ? Py_True : Py_False;
        break;
    default:
        PyErr_Format(PyExc_TypeError,
                     "'%s' not supported between instances of '%.100s' and '%.100s'",
                     opstrings[op],
                     v->ob_type->tp_name,
                     w->ob_type->tp_name);
        return NULL;
    }
    Py_INCREF(res);
    return res;
}
The not operator is defined in Objects/object.c as follows (definition order
reverse in actual sources):
/* equivalent of 'not v'
   Return -1 if an error occurred */
int PyObject_Not(PyObject *v)
{
    int res;
    res = PyObject_IsTrue(v);
    if (res < 0)
        return res;
    return res == 0;
}

/* Test a value used as condition, e.g., in a for or if statement.
   Return -1 if an error occurred */
int PyObject_IsTrue(PyObject *v)
{
    Py_ssize_t res;
    if (v == Py_True)
        return 1;
    if (v == Py_False)
        return 0;
    if (v == Py_None)
        return 0;
    /*
        IMPORTANT: skip the rest because we are working with bool so this
        function will return after the first or the second if statement!
    */
}
So a rough overview of calculating the above expressions is:
not- call 1 function which compares the argument withPy_True/Py_False, compare its result with 0is/is not- do a switch/case/break, compare the result toPy_True/Py_False, call 1 function (Py_INCREF)==/!=- switch/default (that is evaluate all case conditions before that), call 1 function (PyObject_RichCompare), which performs couple of checks and calls another function (do_richcompare), which does a few more checks before executing switch/case/compare toPy_True/Py_False, callPy_INCREFand return the result.
Obviously not has the shortest code which needs to be executed.
We can also invoke the dis module, aka disassembler of Python byte code into mnemonics
like so (it needs a function to dissasemble):
import dis

def f(result):
    if False:
        pass
print(dis.dis(f))
From the results below you can see that all expression variants are very similar:
--------------- if False -------------------------

              0 LOAD_GLOBAL              0 (False)
              3 POP_JUMP_IF_FALSE        9

              6 JUMP_FORWARD             0 (to 9)
        >>    9 LOAD_CONST               0 (None)
             12 RETURN_VALUE            None
--------------- if not result --------------------
              0 LOAD_FAST                0 (result)
              3 POP_JUMP_IF_TRUE         9

              6 JUMP_FORWARD             0 (to 9)
        >>    9 LOAD_CONST               0 (None)
             12 RETURN_VALUE            None
--------------- if result is False ---------------
              0 LOAD_FAST                0 (result)
              3 LOAD_GLOBAL              0 (False)
              6 COMPARE_OP               8 (is)
              9 POP_JUMP_IF_FALSE       15

             12 JUMP_FORWARD             0 (to 15)
        >>   15 LOAD_CONST               0 (None)
             18 RETURN_VALUE            None
--------------- if result is not True ------------
              0 LOAD_FAST                0 (result)
              3 LOAD_GLOBAL              0 (True)
              6 COMPARE_OP               9 (is not)
              9 POP_JUMP_IF_FALSE       15

             12 JUMP_FORWARD             0 (to 15)
        >>   15 LOAD_CONST               0 (None)
             18 RETURN_VALUE            None
--------------- if result != True ----------------
              0 LOAD_FAST                0 (result)
              3 LOAD_GLOBAL              0 (True)
              6 COMPARE_OP               3 (!=)
              9 POP_JUMP_IF_FALSE       15

             12 JUMP_FORWARD             0 (to 15)
        >>   15 LOAD_CONST               0 (None)
             18 RETURN_VALUE            None
--------------- if result == False ---------------
              0 LOAD_FAST                0 (result)
              3 LOAD_GLOBAL              0 (False)
              6 COMPARE_OP               2 (==)
              9 POP_JUMP_IF_FALSE       15

             12 JUMP_FORWARD             0 (to 15)
        >>   15 LOAD_CONST               0 (None)
             18 RETURN_VALUE            None
--------------------------------------------------
The last 3 instructions are the same (that is the implicit return None of the function).
LOAD_GLOBAL is to "read" the True or False boolean constants and
LOAD_FAST is to "read" the function parameter in this example.
All of them _JUMP_ outside the if statement and the only difference is
which comparison operator is executed (if any in the case of not).
UPDATE 1: as I was publishing this blog post I read the following comments from Ammar Askar who also gave me a few pointers on IRC:
Note that this code path also has a direct inlined check for booleans, which should help too: https://t.co/YJ0az3q3qu
— Ammar Askar (@__ammar2__) December 6, 2019
So go ahead and take a look at
case TARGET(POP_JUMP_IF_TRUE).
UPDATE 2:
After the above comments from Ammar Askar on Twitter and from Kevin Kofler below I decided to try and change one of the expressions a bit:
t = timeit.Timer(
"""
result = not result
if result:
    pass
"""
,
"""
import os
result = os.path.isdir('/tmp')
"""
)
that is, calculate the not operation, assign to variable and then evaluate the
conditional statement in an attempt to bypass the built-in compiler optimization.
The dissasembled code looks like this:
0 LOAD_FAST                0 (result)
2 UNARY_NOT
4 STORE_FAST               0 (result)

6 LOAD_FAST                0 (result)
8 POP_JUMP_IF_FALSE       10
10 LOAD_CONST              0 (None)
12 RETURN_VALUE            None
The execution time was around 0.022 which is between is and ==. However the
not result operation itself (without assignment) appears to execute for 0.017
which still makes the not operator faster than the is operator, but only just!
Like already pointed out this is a fairly complex topic and it is evident that not everything can be compared directly in the same context (expression).
P.S.
When I teach Python I try to explain what is going on under the hood. Sometimes I draw squares on the whiteboard to represent various cells in memory and visualize things. One of my students asked me how do I know all of this? The essentials (for any programming language) are always documented in its official documentation. The rest is hacking around in its source code and learning how it works. This is also what I expect people working with/for me to be doing!
See you soon and Happy learning!
There are comments.
How to start solving problems in the QA profession
3 months ago Adriana and I hosted a discussion panel at QA: Challenge Accepted conference together with Aleksandar Karamfilov (Pragmatic), Gjore Zaharchev (Seavus, Macedonia) and Svetoslav Tsenov (Progress Telerik). The recording is available below in mixed Bulgarian and English languages:
The idea for this was born at the end of the previous year mainly because I was disappointed by what I was seeing in the local (and a bit of European) QA communities. In this interview Evgeni Kostadinov (Athlon) says:
I would advise everyone who is now starting into Quality Assurance to display mastership at work.
This is something that we value very strongly in the open source world. For example in Kiwi TCMS we've built a team of people who contribute on a regular basis, without much material rewards, constantly improve their skills, show progress and I (as the project leader) am generally happy with their work. OTOH I do lots of in-house training at companies, mostly teaching programming to testers (Python & Ruby). Over the last 2 years I've had 30% of people who do fine, 30% of people who drop out somewhere in the middle and 30% of people who fail very early in the process. That is 60% failure rate on entry level material and exercises!
All of this goes to show that there is big disparity between professional testing and the open source world I live in. And I want to start tackling the problems because I want the testers in our communities to really become professional in their field so that we can work on lots more interesting things in the future. Some of the problems that I see are:
- Lack of personal motivation - many people seem comfortable at entry level positions and when faced with the challenge to learn or do something new they fail big time
- Using the wrong titles/job positions in the wrong context - calling QA somebody who's clearly a tester or calling Senior somebody who barely started their career. All of that leads to confusion across the board
- Lack of technical skills, particularly when it comes to programming - how would you expect to do software testing if you have no idea how that software is built ?!? How are you going to get advantage of new tools and techniques when most of them are based around automation and source code ?!?
Motivation
I am strong believer that personal motivation is key to everything. However this is also one of my weakest points. I don't know how to motivate others because I never felt the need for someone else to motivate me. I don't understand why there could be people who are seemingly satisfied with a very low hanging fruit when there are so many opportunities waiting for them. Maybe part of my reasoning is because of my open source background where DIY is king, where "Talk is cheap. Show me the code." is all that matters.
Discussion starts with Svetoslav who doesn't have a technical education/background. He's changed profession later in life and in recent years has been speaking at some events about testing they do in the NativeScript team.
Svetoslav: He realized that he needs to make a change in his life, invested lots in studying (not just 3 months) all the while traveling between his home town and Sofia by car and train and still keeping his old job to be able to pay the bills. He sees the profession not as a lesser field compared to development but as equal. That is he views himself as an engineer specializing in testing.
Aleksandar: There are no objective reasons for some people to be doing very good in our field while others fail spectacularly. This coming from the owner of one of the biggest QA academies in the country. A trend he outlines is the folks who come for knowledge and put their effort into it and the ones who are motivated by the relatively high salary rates in the industry. In his opinion current practitioners should not be giving false impression that the profession is easy because there are equally hard items as in any other engineering field. Wrong impression about how hard/easy it is to achieve the desired monetary reward is something that often leads to failure.
Gjore: Coming from his teaching background at the University of Niš he says people generally have the false impression they will learn everything by just attending lectures/training courses and not putting effort at home. I can back this up 100% judging by performance levels of my corporate students. Junior level folks often don't understand how much they need to invest into improving their skills especially in the beginning. OTOH job holders often don't want to listen to others because they think they know it all already. Another field he's been experimenting with is a mentoring program.
Tester, QA, QE, etc - which is what and why that matters
IMO part of the problem is that we use different words to often describe the same thing. Companies, HR, employees and even I are guilty of this. We use various terms interchangeably while they have subtle but important differences.
As a friend of mine told me
even if you write automation all the time if you do it after the fact (e.g. after a bug was reported) then you are not QA/QE - you are a simple tester (with a slightly negative connotation)
Aleksandar: terminology has been defined long time ago but the problem comes from job offers which use the wrong titles (to make the position sound sexier). Another problem is the fact that Bulgaria (also Macedonia, Serbia and I dare say Romania) are predominantly outsourcing destinations: your employer really needs testers but fierce competition, lack of skilled people (and distorted markets), etc leads to distortion in job definitions. He's blaming companies that they don't listen enough to their employees.
Note: there's nothing bad in being "just a tester" executing test scenarios and reporting bugs. That was one of the happiest moments in my career. However you need to be aware of where you stand, what is required from you and how you would like to develop in the future.
Svetoslav: Doesn't really know all the meaning of all abbreviations and honestly doesn't really care. His team is essentially a DevOps team with lots of mixed responsibility which necessitates mixed technical and product domain skills. Note that Progress is by contrast a product company, which is also the field I've always been working in. That is to be successful in a product company you do need to be a little bit of everything at different times so the definition of quality engineer gets stretched and skewed a lot.
Gjore: He's mostly blaming middle level management b/c they do not posses all the necessary technical skills and don't understand very well the nature of technical work. In outsourcing environment often people get hired just to provide head count for the customer, not because they are needed. Software testing is relatively new on the Balkans and lots of people still have no idea what to do and how to do it. We as engineers are often silent and contribute to these issues by not raising them when needed. We're also guilty of not following some established processes, for example not attending some required meetings (like feature planning) and by doing so not helping to improve the overall working process. IOW we're not always professional enough.
Testers and programming
Testers should be code literate. Reading code is a crucial skill for any tester and writing code has so many uses beyond just boilerplate automation. https://t.co/Tts0rzHI4Y
— Amber Race (@ambertests) March 24, 2019
On one of my latest projects we've burned through the following technologies in the span of 1 year: Rust, Haskell, Python, React, all sorts of cloud vendors (pretty much all of them) and Ansible of course. Testing was adjusted as necessary and while hiring we only ask for the person to have adequate coding skills in Python, Bash or any other language. The rest they have to learn accordingly.
So what to do about it? My view is that anyone can learn programming but not many people do it successfully.
Svetoslav: To become an irreplaceable test engineer you need skills. Broad technical skills are a must and valued very highly. This is a fact, not a myth. Information is easily accessible so there's really no excuse not to learn. Mix in product and business domain knowledge and you are golden.
Aleksandar: Everyone looks like they wish to postpone learning something new, especially programming. Maybe because it looks hard (and it is), maybe because people don't feel comfortable in the subject, maybe because they haven't had somebody to help them and explain to them critical concepts. OTOH having all of that technical understanding actually makes it easier to test software b/c you know how it is built and how it works. Sometimes the easiest way to explain something is by showing its source code (I do this a lot).
Advice to senior folks: don't troll people who have no idea about something they've never learned before. Instead try to explain it to them, even if they don't want to hear it. This is the only way to help them learn and build skills. In other words: be a good team player and help your less fortunate coworkers.
Gjore: A must have is to know the basic principles of object oriented programming and I would add also SOLID. With the ever changing landscape of requirements towards our profession we're either into the process of change or out of this process.
Summary and action items
The software testing industry is changing. All kind of requirements are pushing our profession outside its comfort zone, often outside of what we signed up for initially. This is a fact necessitated by evolving business needs and competition. This is equally true for product and outsourcing companies (which work for product companies after all). This is equally true for start-ups, SME and big enterprises.
 Image from No Country for Old QA, Emanuil Slavov (Komfo)
What can we do about it ?
Svetoslav: Invest in building an awesome (technical) team. Make it a challenge to learn and help your team mates to learn with you. However be frank with yourself and with them. Ask for help if you don't know something. Don't be afraid to help other people level-up because this will ultimately lead to you leveling-up.
Aleksandar: Industry should start investing in improving workers qualification level because Bulgaria is becoming an expensive destination. We're on-par with some companies in western Europe and USA (coming from a person who also sells the testing service). Without raising skills level we're not going to have anything competitive to offer. Also pay attention to building an inclusive culture especially towards people on the lowest level in terms of skills, job position, responsibilities, etc.
Gjore: Be the change, drive the change, otherwise it is not going to happen!
So here are my tips and tricks the way I understand them:
- Find your motivation and make sure it is the "correct" one - there's nothing wrong in wanting a higher salary but make sure you are clear that you are trading in your time and knowledge for that. Knowing what's in it for you will help you self motivate and pull yourself through hard times
- Find a mentor if possible - I've never had one so I can't offer much advise here
- Software testing is hard, no kidding. Some researchers claim it is even harder than software development because the field of testing encompasses the entire field of development
- Once you understand the concepts and how things work it becomes easy. We do have very fast rate of technology change but most of the things are not fundamental paradigm change. Building on this basic knowledge makes things easier (or to put it mildly: everything has been invented by IBM in the 1970s)
- You will not learn everything (not even close) in a short course. I've spent 5 years in engineering university learning how software and hardware works. I've been programming for the past 20 years every single day. This makes it easier but there are lots of things I have not idea about. 30-60 minutes of targeted learning and applying what you learn goes a long way over the course of many years
- Invest in yourself, nobody is going to do it for you. If you look at github.com/atodorov you will notice that everything is green. If you drill down by year you will find this is the case for the past 3-4 years only. The 10 years before that I've spent building up to this moment. It is only now that I get to reap some of the benefits of doing so (like a random Silicon Valley startup telling me they are fans of my work or being invited as a speaker at events)
- Programming is hard, when you don't know the basic concepts and when you lack the framework to think about abstractions (loops, conditionals, etc). When you learn all of this it becomes harder because you need to learn different languages and frameworks. However it is not impossible. There are lots of free materials available online, now more than ever
- Think about your "position" in the team/company. What do you do, what is required of you, how can you do it better ? Call things with their real names and explain to your coworkers which is what. This will bring more consistency in the entire community
Lots of these items sound cliche but they are true. There's nothing stopping you from becoming the best QA engineer in the world but you.
To be continued
This first discussion was born out of necessity and is barely scratching the surface. The format is not ideal. We didn't present multiple points of view. We didn't have time to prepare for it to be honest!
Gjore and I made a promise to continue the discussion bringing it to Macedonia and Serbia. I am hoping we can also bring other neighboring countries like Romania and Greece on board and learn from mutual experience.
See you soon and Happy testing!
There are comments.
Contributing to Open Source with Docker, Inc

The rumors have finally been confirmed. Docker, Inc. is opening their new R&D center in Sofia. At an event last night, they stated their intentions to do a fair amount of product development in Sofia as well as contribute to the local society/community too (if I got this correctly). This is very good news for the local eco-system so congrats for that from my side!
This blog post outlines my impressions from the event and a few related more general thoughts.
How did Docker came to Sofia?
I don't know the details but their top team in Bulgaria seems to be coming directly from VMware. So were other engineers present at the event who are based elsewhere. When you think about it this is not surprising at all. (FTR VMware is also directly responsible for having Uber engineering in Sofia).
VMware is one of the few companies in Bulgaria that does real product development and R&D (credit where credit is due). There's even a smaller number of companies developing infrastructure products, e.g. the same things I test on behalf of Red Hat. The majority of the other companies are either outsourcing or focused on products in upper layers of the stack!
Contributing to Open Source according to Docker (and myself)
This BoF session was lead by Andrew Hsu and Sebastiaan van Stijn. The group was predominantly inexperienced in terms of OSS contribution but motivated to try/find a project where they can contribute. From what I could tell they were relatively experienced software engineers.
On my question "what are they planning for the local community in Sofia?" the immediate answer was meet-ups and presentations which is expected. This is how you start and try to establish the level of experience of the local groups and their level of interest in what you are doing.
I prompted a bit further about workshops or hackathons and they told me they've had a hacking even in Paris but didn't elaborate much further. Maybe it is too early for them to be able to give more detailed answers. Let's hope we'll see more practical events.
Andrew did outline the general principles of their community (aka don't be a jerk), pointed out the various communication channels they have (rip IRC), the fact that internally the company uses GitHub and encourages cross-team participation via the pull request workflow. This is what my friends at Bitergia call "inner source" and is a good thing!
A few of the participants asked how and where to start and all I kept hearing was "follow pull requests on GitHub", "do you want to see some source code"! This is something I take issue with so let me explain.
While that has been the historical model for doing open source, aka dig straight into the problem, and also how I started and still do open source I think it doesn't work in the modern world. What I've seen from my students and folks which I've trained is that they have far too many opportunities to be bothered to dig deep into something which seemingly puts roadblocks on every step of the way. Especially when you are a new comer. I myself experience this regularly and often get frustrated by communities who make it damn nearly impossible to land a code change. My only motivation here is that I depend on that component being fixed and there is no work-around.
To be fair to Docker our Fedora or Red Hat communities aren't much better in this regard. In most of the projects I've contributed they kind of expect you to be motivated enough and be able to figure out both process and technical details mostly on your own! Maybe it is the nature of working on platform and infrastructure. You do need a fair bit of general knowledge and specific system knowledge to work on such projects.
My personal experience leading Kiwi TCMS has been that most contributors need a long time to settle in and feel comfortable in the project and that they do need a fair amount of hand holding.
First and fore-most many contributors don't know the underlying technology well enough. For complex software there's also the whole issue of computer science 101, operating systems, how the kernel or virtualization engine works, etc. Then you need to know the architecture of the software you want to fix, the libraries and frameworks it uses - this helps you quickly navigate to the place which needs a patch. Honestly this takes years to master and to develop a gut feeling about it. On the outside it may look easy because active contributors have had many years of experience acquiring this knowledge.
Then we have the "process" part. How do I open or rebase a pull request. How to amend commits, etc. This is something I learned the hard way but I've shown it to other people and they were able to advance much more quickly. Also things like how do you communicate with others in the community, how do you "push" for some types of changes, etc. Dedicated mentors will help a lots here, but that also means dedicated contributors.
We do provide a detailed technical training and on-boarding program and mentoring for Kiwi TCMS and still there are more people who give it a try and drop out compared to those who stay with the team. We still expect commitment and finishing the tasks one set out to complete though.
My initial impression (from Docker) for the moment is very guarded and mostly critical. I feel like they are interested in finding folks to contribute to their own repositories and then hire them (that is expected) but I don't feel like they care much about what happens outside their own projects. I hope I am wrong and we do see engineers (regardless of who employs them) contributing all over the place on a regular basis.
What is the problem ?
The problem for the local eco-system (and it is a world wide problem) is that there are many companies coming in but there is a very limited pool of talent. Especially in less popular fields like research, operating systems and low level infrastructure. That takes many years to develop in house and to reach critical mass for a thriving community. I don't feel we are there yet!
In a later blog post I will describe the history of ScyllaDB which is the measure of success I would like to see in Bulgaria.
The problem I see for the open source community (in the country) is that nobody is really working on developing that. There are small efforts by individuals or a few companies but the mechanics of open source and the culture of free sharing of knowledge is something I don't see yet. I fail to see a program, like Google Summer of Code perhaps, where developers are encouraged and supported to contribute just for the sake of contributing.
Also I fail to see a structure which will help new contributors and young developers set out on a path of meaningful contributions early in their career and by doing this improve their skills and personal brand which ties in with the first paragraph.
These are some things I have observed and some gut feelings from someone who's been doing open source for 15+ years. I can't pin point exact reason why this is happening. I don't have a recipe how to fix it!
I do however keep in touch with like minded folks from several other companies and we've discussed these topics occasionally. We do have some ideas but lack critical mass, shared goal and self-organization.
There are comments.
The Art of [Unit] Testing
A month ago I held a private discussional workshop for a friend's company in Sofia. With people at executive positions on the tech & business side we discussed some of their current problems with respect to delivering a quality product. Additionally I had a list of pre-compiled questions from members of the technical team, young developers, mostly without formal background in software testing! Some of the answers were inspired by The Art of Unit Testing by Roy Osherove hence the title!
Questions
Types of testing, general classification
There are many types of testing! Unit, Integration, System, Performance and Load, Mutation, Security, etc. Between different projects we may use the same term to refer to slightly different types of testing.
For example in Kiwi TCMS we generally test with a database deployed, hit the application through its views (backend points that serve HTTP requests) and assert on the response of these functions. The entire request-response cycle goes through the application together with all of its settings and add-ons! In this project we are more likely to classify this type of testing as Integration testing although at times it is more closer to System testing.
The reason I think Kiwi TCMS is more closer to integration testing is because we execute the tests against a running development version of the application! The test runner process and the SUT process are in the same memory space (different threads sometimes). In contrast full system testing for Kiwi TCMS will mean building and deploying the docker container (a docker compose actually), hitting the application through the layer exposed by Docker and asserting on the results. Here test runner and SUT are two distinctly separate processes. Here we also have email integration, GitHub and Bugzilla integration, additional 3rd party libraries that are installed in the Docker imaga, e.g. kerberos authentication.
In another example for
pelican-ab we mostly have unit
tests which show the SUT as working. However pelican-ab for a static HTML generator
and if failed miserably with DELETE_OUTPUT_DIRECTORY=True setting! The problem here is that
DELETE_OUTPUT_DIRECTORY doesn't control anything in the SUT but does control
behavior in the outer software! This can only be detected with integration tests,
where we perform testing of all integrated modules to verify the combined functionality,
see here.
As we don't depend on other services like a database I will classify this as pure integration testing b/c we are testing a plugin + specific configuration of the larger system which enforces more constraints.
My best advice is to:
1) have a general understanding of what the different terms mean in the industry 2) have a consensus within your team what do you mean when you say X type of testing and Y type of testing so that all of you speak the same language 3) try to speak a language which is closest to what the rest of the industry does, baring in mind that we people abuse and misuse language all the time!
What is unit testing
The classical definition is
A unit test is a piece of code (usually a method) that invokes another piece of code and checks the correctness of some assumptions afterwards. If the assumptions turn out to be wrong the unit test has failed. A unit is a method or function.
Notice the emphasis above: a unit is method or a function - we exercise these in unit tests. We should be examining their results or in a worse case the state of the class/module which contains these methods! Now also notice that this definition is different from the one available in the link above. For reference it is
42) Unit Testing
Testing of an individual software component or module is termed as Unit Testing.
Component can be a single class which comes close to the definition for unit testing but it can be several different classes, e.g. an authentication component handling several different scenarios. Modules in the sense of modules in a programming language almost always contain multiple classes and methods! Thus we unit test the classes and methods but we can rarely speak about unit testing the module itself.
OTOH the second definition gets the following correctly:
It is typically done by the programmer and not by testers, as it requires a detailed knowledge of the internal program design and code.
In my world, where everything is open source we testers can learn how the SUT and its classes and methods work and we can also write pure unit tests. For example in codec-rpm I had the pleasure to add very pure unit tests - call a function and assert on its result, nothing else in the system state changed (that's how the software was designed to work)!
Important:
Next questions ask about how to ... unit test ... and the term "unit test" in them is used wrongly! I will drop this and only use "test" to answer!
Also important - make the difference between unit type test and another type of test written with a unit testing framework! In most popular programming languages unit testing frameworks are very powerful! They can automatically discover your test suite (discovery), execute it (test runner), provide tooling for asserting conditions (equal, not equal, True, has changed, etc) and tooling for reporting on the results (console log, HTML, etc).
For example Kiwi TCMS is a Django application and it uses the standard test framework from Django which derives from Python's unittest! A tester can use pretty much any kind of testing framework to automate pretty much any kind of test! Some frameworks just make particular types of tests easier to implement than others.
How to write our tests without touching the DB when almost all business logic is contained within Active Record objects? Do we have to move this logic outside Active Record, in pure PHP classes that don't touch DB?
To answer the second part - it doesn't really matter. Separating logic from database is a nicer design in general (loosely coupled) but not always feasible. Wrt testing you can either mock calls to the database or perform your tests with the DB present.
For example Kiwi TCMS is a DB heavy applcation. Everything comes and goes to the
database, it hardly has any stand-alone logic. Thus the most natural way to test is together
with the database! Our framework provides tooling to load previously prepared test data
(db migrations, fixtures) and we also use factoryboy to speed up creation of ORM objects
only with the specific attributes that we need for the test!
Key here is speed and ease of development, not what is the best way in theory! In real-life testing there are hardly any best practices IMO. Testing is always very context dependent.
Is it good to test methods with Eloquent ORM/SQL statements and how to do it without a database?
Eloquent is the ORM layer for Laravel thus the question becomes the same as the previous one.! When the application is dependent on the DB, which in their case is, then it makes sense to use a database during testing!
For Feature tests isn't it better to to test them without a DB and b/c we have more business logic there. For them we must be certain that we call the correct methods?
Again, same as the previous one. Use the database when you have to! And two questions:
1) Does the database messes your testing up in some way? Does it prevent you from doing something? If yes, just debug the hell out of it, figure out what happens and then figure out how to fix it 2) What on Earth is we must be certain that we call the correct methods mean? (I am writing this as personal notes before the actual session took place). I suspect that this is the more general am I testing for the right thing question which inexperienced engineers ask. My rule of thumb is: check what do you assert on. Are you asserting that the record was created in the DB (so verifying explicitly permissions, DB setup, ORM correctness) or that the result of the operation mathes what the business logic expects (so verifying explicitly the expected behavior and implicitly that all the layers below managed to work so the data was actually written to disk)? At times both may be necessary (e.g. large system, lots of cachine, eventual consistency) but more often than not we need to actually assert on the business logic.
Example:
- technical validation: user tries to register an account, assert email was sent or
- business/behavior validation: user tries to register an account, after confirming their intent they are able to login
Optimization for faster execution time, parallel execution
Parallel testing is no, no, no in my book! If you do not understand why something is slow trowing more instances at it increases your complexity and decreases the things you do understand and subsequently are able to control and modify!
Check-out this excellent presentation by Emanuil Slavov at GTAC 2016. The most important thing Emanuil says is that a fast test suite is the result of many conscious actions which introduced small improvements over time. His team had assigned themselves the task to iteratively improve their test suite performance and at every step of the way they analyzed the existing bottlenecks and experimented with possible solutions.
The steps in particular are (on a single machine):
- Execute tests in dedicated environment;
- Start with empty database, not used by anything else; This also leads to adjustments in your test suite architecture and DB setup procedures;
- Simulate and stub external dependencies like 3rd party services;
- Move to containers but beware of slow disk I/O;
- Run database in memory not on disk because it is a temporary DB anyway;
- Don't clean test data, just trash the entire DB once you're done; Will also require adjustments to tests, e.g. assert the actual object is there, not that there are now 2 objects;
- Execute tests in parallel which should be the last thing to do!
- Equalize workload between parallel threads for optimal performance;
- Upgrade the hardware (RAM, CPU) aka vertical scaling; I would move this before parallel execution b/c test systems usually have less resources;
- Add horizontal scaling (probably with a messaging layer);
There are other more heuristical approaches like not running certain tests on certain branches and/or using historical data to predict what and where to execute. If you want to be fancy couple this with an ML algorithm but beware that there are only so many companies in the world that will have any real benefit from this. You and I probably won't. Read more about GTAC 2016.
Testing when touching the file system or working with 3rd party cloud providers
If touching the filesystem is occasional and doesn't slow you down ignore it! But also make sure you do have a fast disk, this is also true for DB access. Try to push everything to memory, e.g. large DB buffers, filesystem mounted in memory, all of this is very easy in Linux. Presumption here is that these are temporary objects and you will destroy them after testing.
Now if the actual behavior that you want to test is working with a filesystem (e.g. producing files on disk) or uploading files to a cloud provider there isn't much you can do about it! This is a system type of test where you rely on integration with a 3rd party solution.
For example for django-s3-cache you need to provide your Amazon S3 authentication tokens before you can execute the test suite. It will comminicate back and forth with AWS and possibly leave some artifacts there when it is done!
Same thing for lorax, where the essence
of the SUT is to build Linux images ready to be deployed in the cloud! Checkout the
PR above and click the View details button at the bottom right to see the various
test statuses for this PR:
- Travis CI - pylint + unit test + some integration type tests (cli talks to API server)
- very basic sanity tests (invoking the application cli via bash scripts). This hits the network to refresh with RPM package data from Fedora/CentOS repositories.
- Jenkins jobs for AWS, Azure, OpenStack, Vmware, other (tar, Docker, stand-alone KVM). These will run the SUT, get busy for about 10 minutes to compose a cloud image of the chosen format, extract the file to a local directory, upload to the chosen cloud vendor, spin up a VM there and wait for it to initialize, ssh to the VM and perform final assertions, e.g. validating it was able to boot as we expected it to. This is for x86_64 and we need it for Power, s390x and ARM as well! I am having troubles even finding vendors that support all of these environments! Future releases will support even more cloud environments so rinse and repeat!
My point is when your core functionality depends on a 3rd party provider your testing will depend on that as well. In the above example I've had the scenario where VMs in Azure were taking around 1hr to boot up. At the time we didn't know if that was due to us not integrating with Azure properly (they don't use cloud-init/NetworkManager but their own code which we had to install and configure inside the resulting Linux image) or because of infrastructure issues. It turned out Azure was having networking trouble at the time when our team was performing final testing before an important milestone. Sigh!
With what tests (Feature or Unit) should I start before refactoring?
So you know you are going to refactor something but it doesn't have [enough] tests? How do you start? The answer will ellude most developers. You do not start by defining the types of testing you should implement. You start with analyzing the existing behavior: how it works, what conditions it expects, what input data, what constraints, etc. This is very close to black-box testing techniques like decision tables, equivalence partitioning, etc with the added bonus that you have access to the source code and can more accurately figure out what is the actual behavior.
Then you write test scenarios (Given-When-Then or Actions 1, 2, 3 + expected results). You evaluate these scenarios if they encompass all the previously identified behavior and classify the risk assiciated with them. What if Scenario X fails after refactoring? Cloud be the code is wrong, could be the scenario is incomplete. How does that affect schedule, user experience, business risk (often money), etc.
Above is tipically the job of a true tester as illustrated by this picture from
Ingo Philipp, full presentation
here
Then and only then you sit down and figure out what types of tests are needed to automate the identified scenarios, implement them and start refactoring.
What are inexperienced developers missing most often when writing tests? How to make my life easier if I am inexperienced and just starting with testing?
See the picture above! Developers, even experienced ones have a different mind set when they are working on fixing code or adding new features. What I've seen most oftenly is adding tests only for happy paths/positive scenarios and not spending enough time to evaluate and exercise all of the edge cases.
True 100% test coverage is impossible in practice and there are so many things that can go wrong. Developers are typically not aware of all that because it is tipically not their job to do it.
Also testing and development require different frame of mind. I myself am a tester but I do have formal education in software engineering and regularly contribute as developer to various projects (2000+ GitHub conributions as of late). When I revisit some tests I've written I often find they are pointless and incorrect. This is because at the time I've been thinking "how to make it work", not "how to test it and validate it actually works".
For an engineer without lots of experience in testing I would recommend to always start with a BDD exercise. The reason is it will put you in a frame of mind to think about expected behavior from the SUT and not think about implementation. This is the basis for asking questions and defining good scenarios. Automation testing is a means of expression, not a tool to find a solution to the testing problem!
Check-out this BDD experiment I did and also the resources here.
Inside-out(Classi approach) vs Outside-in(Mockist approach)? When and why?
These are terms associated with test driven development (TDD). A quick search reveals an excellent article explaining this question.
Inside Out TDD allows the developer to focus on one thing at a time. Each entity (i.e. an individual module or single class) is created until the whole application is built up. In one sense the individual entities could be deemed worthless until they are working together, and wiring the system together at a late stage may constitute higher risk. On the other hand, focussing on one entity at a time helps parallelise development work within a team.
This sounds to me is more suitable for less experienced teams but does require a strong senior personel to control the deliverables and steer work in the right direction.
Outside In TDD lends itself well to having a definable route through the system from the very start, even if some parts are initially hardcoded. The tests are based upon user-requested scenarios, and entities are wired together from the beginning. This allows a fluent API to emerge and integration is proved from the start of development. By focussing on a complete flow through the system from the start, knowledge of how different parts of the system interact with each other is required. As entities emerge, they are mocked or stubbed out, which allows their detail to be deferred until later. This approach means the developer needs to know how to test interactions up front, either through a mocking framework or by writing their own test doubles. The developer will then loop back, providing the real implementation of the mocked or stubbed entities through new unit tests.
I've seen this in practice in welder-web. This is the web UI for the above mentioned cloud image builder. The application was developed iteratively over the past 2 years and initially many of the screens and widgets were hard-coded. Some of the interactions were not even existing, you click on a button and it does nothing.
This is more of an MVP, start-up approach, very convenient for frequent product demos where you can demonstrate that some part of the system is now working and it shows real data!
However this requires a relatively experienced team both testers and developers and relatively well defined product vision. Individual steps (screens, interactions, components) may not be so well defined but everybody needs to know where the product should go so we can adjust our work and snap together.
As everything in testing the real answer is it depends and is often a mixture of the two.
What is the difference between a double, stub, mock, fake and spy?
These are classic unit testing terms defined by Gerard Meszaros in his book xUnit Test Patterns, more precisely in Test Double Patterns. These terms are somewhat confusing and also used interchangeably in testing frameworks so see below.
Background:
In most real-life software we have dependencies: on other libraries, on filesystems, on database, on external API, on another class (private and protected methods), etc. Pure unit testing (see definition at the top) is not concerned with these because we can't control them. Anytime we cross outside the class under test (where the method which is unit tested is defined) we have a dependency that we need to deal with. This may also apply to integration type tests, e.g. I don't want to hit GitHub every time I want to test my code will not crash when we receive a response from them.
From xUnit Test Patterns
For testing purposes we replace the real dependent component (DOC) with our Test Double. Depending on the kind of test we are executing, we may hard-code the behavior of the Test Double or we may configure it during the setup phase. When the SUT interacts with the Test Double, it won't be aware that it isn't talking to the real McCoy, but we will have achieved our goal of making impossible tests possible.
Example: testing discount algorithm
- Replace the method figuring out what kind of discount the customer is eligible to with a hard-coded test double: e.g. -30% and validate the final price matches!
- In another scenario use a second test double which applies 10% discount when you submit a coupon code. Verify the final price matches expectations!
Here we don't care how the actual discount percentage is determined. This is a dependency. We want to test that the discount is actually applied properly, e.g. there may be 2 or 3 different discounts and only 1 applies or no discount policy for items that are already on sale. This is what you are testing.
Important: when the applying algorithm is tightly coupled with parts of the system that select what types of discounts are available to the customer that means your code needs refactoring since you will be not able to crate a test double (or it will be very hard to do so).
A Fake Object is a kind of Test Double that is similar to a Test Stub in many ways including the need to install into the SUT a substitutable dependency but while a Test Stub acts as a control point to inject indirect inputs into the SUT the Fake Object does not. It merely provides a way for the interactions to occur in a self-consistent manner.
Variations (see here):
- Fake database;
- In-memory database;
- Fake web service (or fake web server in the case of Django);
- Fake service layer;
Use of a Test Spy is a simple and intuitive way to implement an observation point that exposes the indirect outputs of the SUT so they can be verified. Before we exercise the SUT, we install a Test Spy as a stand-in for depended-on component (DOC) used by the SUT. The Test Spy is designed to act as an observation point by recording the method calls made to it by the SUT as it is exercised. During the result verification phase, the test compares the actual values passed to the Test Spy by the SUT with the expected values.
Note: a test spy can be implemented via test double, exposing some of the functionality to the test framework, e.g. expose internal log messages so we can validate them or can be a very complex mock type of object.
From The Art of Unit Testing
A stub is a controllable replacement for an existing dependency (or collaborator) in the system. By using a stub, you can test your code without dealing with the dependency itself.
A mock object is a fake object in the system that decides whether the unit test has passed or failed. It does so by verifying whether the object under test (e.g. a method) interacted as expected with the fake object.
Stubs can NEVER fail a test! The asserts are aways against the class/method under test. Mocks can fail a test! We can assert how the class/method under test interacted with the mock.
Example:
When testing a registration form, which will send a confirmation email:
- Checking that invalid input is not accepted - will not trigger
send_mail()so we usually don't care about the dependency; - Checking valid input will create a new account in the DB - we stub-out
send_mail()because we don't want to generate unnecessary email traffic to the outside world. - Checking if a banned email address/domain can register - we mock
send_mail()so that we can assert that it was never called (together with other assertions that a correct error message was shown and no record was created in the database); - Checking that valid, non-banned email address can register - we mock
send_mail()and later assert it was called with the actual address in question. This will verify that the system will attempt to deliver a confirmation email to the new user!
To summarize: - When using mocks, stubs and fake objects we should be replacing external dependencies of the software under test, not internal methods from the SUT!. - Beware that many modern test framework use the singular term/class name Mock to refer to all of the things above. Depending on their behavior they can be true mocks or pure stubs.
More practical examples with code:
- Mocking Django AUTH_PROFILE_MODULE without a Database
- Bad Stub Design in DNF
- Bad Stub Design in DNF, Pt.2
- Beware of Double Stubs in RSpec
How do we test statistics where you have to create lots of records in different states to make sure the aggregation algorithms work properly?
Well there isn't much to do around this - create all the records and validate your queries! Here the functionality is mostly filter records from the database, group and aggregate them and display the results in table or chart form.
Depending on the complexity of what is displayed I may even go without actually automating this. If we have a representative set of test data (e.g. all possible states and values) then just make sure the generated charts and tables show the expected information.
In automation the only scenario I can think about is to re-implement the statistics
algorithm again! Doing a select() && stats() and assert stats(test_data) == stats()
doesn't make a lot of sense becase we're using the result of one method to validate
itself! It will help discover problems with select() but not with the actual
calculation!
Once you reimplement every stats twice you will see why I tend to go for manual testing here.
How to test various filters and searches which need lots of data?
First ask yourself the question - what do you need to test for?
- That all values from the webUI are passed down to the ORM
- That the ORM will actually return the records in question (e.g. active really means active not the opposite)
- which columns will be displayed (which is a UI thing)
For Kiwi TCMS search pages we don't do any kind of automated testing! These are very static HTML forms that pass their values to a JavaScript function which passes them to an API call and then renders the results! When you change it you have to validate it manually but nothing more really.
It is good to define test scenarios, especially based on customer bug reports but essentially you are checking that a number of values are passed around which either works or it doesn't. Not much logic and behavior to be tested there! Think like a tester, not like a developer!
How to test an API? Should we use an API spec schema and assert the server side and client side based on it?
This is generally a good idea. The biggest troubles with APIs is that they change without warning, sometimes in an incompatible way and clients are not aware of this. A few things you can do:
- Use API versioning and leave older versions arround for as long as necessary. Facebook for example keeps their older API versions around for several years.
- Use some sort of contract testing/API specification to validate behavior. I find value here to have a test suite which explicitly exercises the external API in the desired ways (full coverage of what the application uses) so it can detect when something breaks. If this is not 100% all the time it will become useless very quickly.
- Record and replay may be useful at scale, Twitter uses similar approach with anonimizing the actual values being sent around and also accounting for parameter types, e.g. an int X can receive only ints and if someone tries to send a string that was probably an error. Twitter however has access to their entire production data and can perform such kind of sampling.
What types of tests do QA people write? (I split this from the next question).
As should be evident by my many example nobody stops us from writing any kind of test in any kind of programming language. This only depends on personal skills and the specifics of the project we work on.
Please refer back to the codec-rpm, lorax and welder-web projects. These are components from a larger product named Composer which builds Linux cloud images.
welder-web is the front-end which integrates with Cockpit. This is written with React.js, includes some component type tests (I think close to unit tests but I haven't worked on them), end-to-end test suite (again JavaScript) similar to what you do with Selenium - fire up the browser and click on widgets.
lorax is a Python based backend with unit and integration tests in Python. I mostly work on testing the resulting cloud images which uses a test framework for Bash script, ansible, Docker and a bunch of vendor specific cli/api tools.
codec-rpm is smaller component from another backend called BDCS which is written in Haskell. As I showed you I've done some unit tests (and bug fixes even) and for bdcs-cli I did work on similar cloud image tests in bash script. This component is now frozen but when/if it picks up all the existing bash scripts will need to be ported plus any unit tests which are missing will have to be reimplemented in Haskell. Whoever on the team is free will get to do it.
At the very beginning we used to have a 3rd backend written in Rust but that was abandoned relatively quickly.
To top this off a good QE person will often work on test related tooling to support their team. I personally have worked on Cosmic-Ray - mutation testing tool for Python used by Amazon and others, I am the current maintainer of pylint-django - essentially a developer tool but I like to stretch its usage with customized plugins and of course Kiwi TCMS which is a test management tool.
How do they (testers) know what classes I am going to create so they are able to write tests for them beforehand?
This comes from test driven development practices. In TDD (as everywhere in testing) you will start with analisys what components are needed and how they will work. Imagine that I want you to implement a class that represents a cash-desk which can take money and store them, count them, etc. Imagine this is part of a banking application where you can open accounts, transfer money between them, etc.
With TDD I start by implementing tests for the desired behavior. I will import solution
and I will create an object from the Bill class to represent a 5 BGN note.
I don't care how you want to name your classes! The tests serve to enforce the interface
I need you to implement: module name, classes in the module, method names, behavior.
Initially in TDD the tests will fail. Once functionality becomes to be implemented piece by piece tests will start passing one by one! In TDD testers don't know, we expect developers to do something otherwise tests fail and you can't merge!
In practice there is a back-and-forth process!
The above scenario is part of my training courses where I give students homework assignments and I have already provided automated test suites for the classes and modules they have to implement. Once the suite reports PASS I know the student has at least done good enough implementation to meet the bare minimum of requirements. See an example for the Cash-Desk and Bank-Account problems at https://github.com/atodorov/qa-automation-python-selenium-101/tree/master/module04
How to test functionality which is date/time dependent?
For example a certain function should execute on week days but not on the weekend. How do we test this? Very simple, we need to time travel, at least out tests do.
Check-out php-timecop and this introductory article. Now that we know what stubs are we simply use a suitable library and stub out date/time utilities. This essentially gives you the ability to freeze the system clock or time travel backwards and forwards in time so you can execute your tests in the appropriate environment. There are many such time-travel/time-freeze libraries for all popular programming languages.
Given the two variations of the method below:
public function updateStatusPaid()
{
    $this->update([
        'date_paid' => now(),
        'status' => 'paid'
    ]);
}

public function updateStatusPaid()
{
    $this->date_paid = now();
    $this->status = 'paid';
    $this->save();
}
How do we create a test which validates this method without touching the database? Also we want to be able to switch between method implementations without updating the test code!
Let's examine this in details. Both of these methods change field values for the $this object
and commit that to storage! There is no indication what happened inside other than the
object fields being changed in the underlying storage medium.
Options:
1) Mock the save() method or spy the entire storage layer. This will give you
faster speed of execution but more importantly will let you examine the values before
they leave the process memory space. Your best bet here is replacing the entire
backend portion of the ORM layer which talks to the database. Drawback is that data may not be persistent
between test executions/different test methods (depending on how they are executed and how
the new storage layer works) so chained tests, which depend on data created by other tests
or other parts of the system may break.
2) Modify your method to provide more information which can be consumed by the tests. This is
called engineering for testability. The trouble with this method is that it doesn't
expose anything to the outside world so the only way we can check that something has
changed is to actually fetch it from storage and assert that it is different.
3) Test with the database included. The OP presumes touching a database during testing is
a bad thing. As I've already pointed out this is not necessarily the case. Unless your data
is so big that it is spread around cluster nodes in several shards using a database for
testing is probably the easiest thing you can do.
Now to the second part of the question: if your test is not tightly coupled with the method implementation then it will not need to be changed once you change the implementation. That is if you are asserting on independent system state then you should be fine.
Current problems
This is a list of problems we discussed, my views on them and similar items I've seen in the past. They are valid across the board for many types of companies and teams and my only recommendation here is to analyze the root of your problems and act to resolve them. IMO a lot of the times the actual problems stem from not understanding the roots of what we are trying to validate, not from technological limitations.
Background:
Company is delivering a digital product, over e-mail, without a required login procedure. There are event ticket sites which work like this.
Problem: email delivery fails, customer closes their browser and they can't get back to what they paid for. Essentially customers locks themselves out of the product they paid for.
This is UX problem. Email is inherently unreliable and it can break at many steps along the way. The product is not designed to be fault tolerant and to provide a way for the customer to retrieve their digital products. Options include:
- Browser cookies to remember orders in the last X days
- Well designed error/warning messages about possible data loss
- Require login (email or social) or other means of backup delivery (mobile phone, second email address, etc)
- Login is sometimes required by regulatory bodies (KYC practices) and is also a good starting point for additional marketting/relationship building activities
- Monitoring of email delivery providers and their operation. This is a business critical functionality so it must be treated like that.
Product needs enough input data from customer to produce a deliverable. Problem: Sometimes enough may not be enough, that is the backend algorithm thinks it hass everything and then it runs into some corner case from which it can't recover and is not able to deliver its results to the customer.
I see this essentially as an UX problem:
- Ask customer for more info at the beginning - annoying, slows down initial product adoption, may break the conversion funnel;
- Calculate what we can and randomly pick options from DB (curated or based on statistics) and present them to customer;
- Previous point + allow the customer to proceed or go back and refine the selection which was automatically made for them - this is managing the UX experience around the technological limitations
Infrastructure problems: site doesn't open (not accessible for some reason), big email queue, many levels of cache (using varnish)
Agressive monitoring of all of these items with alerts and combined charts. This is business critical functionality and we need to always know what is the status of it. If you want to be fancy couple this with an ML/AI algorithm which will predict failures in advance so you can be on alert before that happens.
More importantly each problem in production must be followed by a post-mortem session (more on that later).
Integration with payment processors: how do you test this in production ?
Again agressive monitoring when/if these integrations are up and running, then:
Design a small test suite which goes directly on the website and examines if all payment options are available. This will catch scenarios where you claim PayPal is supported but for some reason the form didn't load. The problem may not be on your side! Check preferences per country (may have been editted by admin on the backend), make sure what you promised is always there.
I've used similar approach in a trading startup. We run the suite once every hour directly agains prod. Results were charted in Grafana together with the rest of the monitoring metrics. In the first two days we found that the HTML form provided by the payment processor was changing all the time - this was supposed to be stable. In the first week we discovered the payment processor had issues on their own and were down for couple of hours during the night our time zone.
There isn't much you can do when you rely on 3rd party services but you can either - cache and retry later, masking the backend failures from the user at your own risk (payment may not be authorized later) - do not accept payment or at least warn the customer if you are seeing/predicting 3rd party issues
Problem: customers cancelling their payments after product was received
Yes, in many countries you can do so many days after you paid and got access to something. I have done so myself after non-delivery of items.
In case this is deliberate action from the customer there isn't much you can do. In case it is because they were frustrated due to problems overzealous monitoring and communicating back to the customers will probably help.
Localization problems, missing translations, UI doesn't look good, missing images
Unless your test team speaks the language they can't understand shit. Best options IMO:
- Allow translator team to preview their work before it is comitted to the current version; A simple staging server will work for this. This is easy to integrate with any translation system;
- Use machine checks: missing format strings, unfilled data (e.g. missing translations), 404 URLs. This is cheap to execute and can be done on Save and provide immediate feedback;
- Many systems provide the option to Review & Approve the work of another peer;
- Some visual testing tools (I don't have much experience here but I know they exist) which will detect strings that are too long and do not fit inside buttons and other widgets. This is more in the category of visual layout testing.
Problem: on mobile version, after new feature was added the 'Buy' button was overlayed by another widget and was not visible
This means that:
- previously it was not defined what testing will be performed for the new feature;
- also that this 'Buy' button was not considered business critical functionality, which it is;
- the person who signed-off on this page was careless;
Test management tools like Kiwi TCMS can help you with organizing and documenting what needs to be tested. However, regardless of the system used, everything starts with identifying which functionality is critical and must always be present! This is the job of a tester!
Once identified as critical you could probably use some tools for visual comparison to make sure this button is always available on this (other) pages. Again a person must identify all the possible interactions we want to check for.
Problem: we released at 18:30 on Friday and went home. We discovered email delivery was broken at 10:00 the next day
Obviously this wasn't well tested since it broke. The root cause must be analized and a test for it added.
Also we are missing a minitoring metric here. If you are sending lots of emails then a drop under, say 50K/hour probably means problems! What's the reason the existing monitoring tools didn't trigger? Investigate and fix it.
Last - do not push & throw over the fence. This is the silo mentality of the past. A small team can allow itself to make these mistakes just a few times, then comapny goes out of business and the people who didn't care enough to resolve the problems go out of a job.
Make a policy which gives you enough time to monitor production and revert in case of problems. There are many reasons lots of companies don't release on Friday (while others do). The point here is to put the policy and entire machinery in place so you can deal with problems when they arise. If you are not equipped to deal with these problems on late Friday night (or any other day/night of the week) you should not be making releases then.
Problem: how do we follow-up after a blunder?
In any growing team or company, especially a startup there is more demand to work on new features than maintain existing code, resolve problems or work on non-visible items like testing and monitoring which will help you the next time there are problems.

An evaluation framework like the Swiss cheese model is a good place to start. Prezi uses it extensively. Various sized holes are the different root causes which will lead to a problem:
- missing tests
- undocumented release procedure
- merged without code review
- incomplete feature specification
- too much work, task overload
The cheese layers can be both technical and organizational. One of them can be the business takeholders organization: wanting too much, not budgeting time for other tasks, tight marketting schedule, etc.
Once a post-mortem is held and the issues at hand analyzed you need to come up with a plan of action. These are your JIRA tickets about what to do next. Some will have immediate priority others will be important 1 year from now. Once the action items are entered into your task tracking software the only thing left to do is priritizing them accordingly.
Important: tests, monitoring, even talking about a post-mortem and other seemingly non-visible tasks are still important. If the business doesn't budget time for their completion it will ultimately fail! You can not sustain adding new features quickly for an extended period of time without taking the time to resolve your architecture, infrastructure, team and who knows what other issues.
Time and resources should be evaluated and assigned according to the importance of the task and the various risks assiciated with it. This is no different from when we do planning for new features. Consider having the ability to analyze, adapt and resolve problems as the most important feature of your organization!
There are comments.
How to authenticate Ansible with Azure
As I am working on cloud image testing for Composer I need to create scripts that can provision virtual machines in multiple cloud platforms. Instead of using their API directly I can reuse the vast majority of Ansible cloud modules.
There are modules for Azure of course however they poorly explain how to configure authentication. Ansible docs say:
For authentication with Azure you can pass parameters,
set environment variables or use a profile stored in
~/.azure/credentials. Authentication is possible using
a service principal or Active Directory user. To authenticate
via service principal, pass subscription_id, client_id, secret
and tenant or set environment variables AZURE_SUBSCRIPTION_ID,
AZURE_CLIENT_ID, AZURE_SECRET and AZURE_TENANT.
This is how you go about configuring these variables.
First install azure-cli tools:
# rpm --import https://packages.microsoft.com/keys/microsoft.asc
# echo -e "[azure-cli]\nname=Azure CLI\nbaseurl=https://packages.microsoft.com/yumrepos/azure-cli\nenabled=1\ngpgcheck=1\ngpgkey=https://packages.microsoft.com/keys/microsoft.asc" > /etc/yum.repos.d/azure-cli.repo
# yum install azure-cli
then login:
$ az login
To sign in, use a web browser to open the page
https://microsoft.com/devicelogin and enter the code XXXXXXXXX to authenticate.
[
  {
    "cloudName": "AzureCloud",
    "id": "8d026bb1-.....",
    "isDefault": true,
    "name": "Pay-as-you-go",
    "state": "Enabled",
    "tenantId": "9f340302-......",
    "user": {
      "name": "atodorov@....",
      "type": "user"
    }
  }
]
Here id==AZURE_SUBSCRITION_ID and tenantId==AZURE_TENANT! Next you need
client id and secret before Ansible can be able to authenticate with Azure!
In fact you need to register an Active Directory Service Principal
which will authenticate with the Azure REST API, in other words when
executing Ansible commands in your shell (or via test script) that will be
treated as an application which must be allowed access to Azure resources.
From the command line this is done by:
$ az ad sp create-for-rbac --name http://ansible-atodorov --role owner --scopes "/subscriptions/$AZURE_SUBSCRIPTION_ID/resourceGroups/$RESOURCE_GROUP_NAME"
{
  "appId": "f86af23a-......",
  "displayName": "ansible-atodorov",
  "name": "http://ansible-atodorov",
  "password": "37d908aa-.......",
  "tenant": "9f340302-........."
}
Note: resource group is an Azure term, you can find more about it here.
In this example appId==AZURE_CLIENT_ID and password==AZURE_SECRET. After exporting
these environment variables you should be able to use Ansible to upload blobs to
Azure or start virtual machines:
$ export AZURE_SUBSCRIPTION_ID=8d026bb1-.....
$ export AZURE_TENANT=9f340302-..............
$ export AZURE_CLIENT_ID=f86af23a-...........
$ export AZURE_SECRET=37d908aa-..............

$ ansible localhost -m azure_rm_storageblob -a "resource_group=composer storage_account_name=composerredhat container=composerredhat blob=linux.vhd src=linux.vhd blob_type=page"
Thanks for reading and happy testing!
There are comments.
Introducing pylint-django 2.0
Today I have released pylint-django version 2.0 on PyPI. The changes are centered around compatibility with the latest pylint 2.0 and astroid 2.0 versions. I've also bumped pylint-django's version number to reflact that.
A major component, class transformations, was updated so don't be surprised if there are bugs. All the existing test cases pass but you never know what sort of edge case there could be.
I'm also hosting a workshop/corporate training about writing pylint plugins. If you are interested see this page!
Thanks for reading and happy testing!
There are comments.
Upstream rebuilds with Jenkins Job Builder
I have been working on Weldr for some time now. It is a multi-component software with several layers built on top of each other as seen on the image below.

One of the risks that we face is introducing changes in downstream components which are going to break something up the stack! In this post I am going to show you how I have configured Jenkins to trigger dependent rebuilds and report all of the statuses back to the original GitHub PR. All of the code below is Jenkins Job Builder yaml.
bdcs is the first layer of our software stack. It provides command line
utilities. codec-rpm is a library component that facilitates working
with RPM packages (in Haskell). bdcs links to codec-rpm when it is compiled,
bdcs uses some functions and data types from codec-rpm.
When a pull request is opened against codec-rpm and testing completes successfully
I want to reuse that particular version of the codec-rpm library and
rebuild/test bdcs with that.
YAML configuration
All jobs have the following structure: -trigger -> -provision -> -runtest -> -teardown. This means that Jenkins will start executing a new job when it gets triggered by an event in GitHub (commit to master branch or new pull request), then it will provision a slave VM in OpenStack, execute the test suite on the slave and destroy all of the resources at the end. This is repeated twice: for master branch and for pull requests! Here's how the -runtest jobs look:
- job-template:
    name: '{name}-provision'
    node: master
    parameters:
      - string:
          name: PROVIDER
    scm:
        - git:
            url: 'https://github.com/weldr/{repo_name}.git'
            refspec: ${{git_refspec}}
            branches:
              - ${{git_branch}}
    builders:
      - github-notifier
      - shell: |
            #!/bin/bash -ex
            # do the openstack provisioning here
        # NB: runtest_job is passed to us via the -trigger job
      - trigger-builds:
          - project: '${{runtest_job}}'
            block: true
            current-parameters: true
            condition: 'SUCCESS'
            fail-on-missing: true


- job-template:
    name: '{name}-master-runtest'
    node: cinch-slave
    project-type: freestyle
    description: 'Build master branch of {name}!'
    scm:
        - git:
            url: 'https://github.com/weldr/{repo_name}.git'
            branches:
                - master
    builders:
      - github-notifier
      - conditional-step:
          condition-kind: regex-match
          regex: "^.+$"
          label: '${{UPSTREAM_BUILD}}'
          on-evaluation-failure: dont-run
          steps:
            - copyartifact:
                project: ${{UPSTREAM_BUILD}}
                which-build: specific-build
                build-number: ${{UPSTREAM_BUILD_NUMBER}}
                filter: ${{UPSTREAM_ARTIFACT}}
                flatten: true
      - shell: |
            #!/bin/bash -ex
            make ci
    publishers:
      - trigger-parameterized-builds:
          - project: '{name}-teardown'
            current-parameters: true
      - github-notifier


- job-template:
    name: '{name}-PR-runtest'
    node: cinch-slave
    description: 'Build PRs for {name}!'
    scm:
        - git:
            url: 'https://github.com/weldr/{repo_name}.git'
            refspec: +refs/pull/*:refs/remotes/origin/pr/*
            branches:
                # builds the commit hash instead of a branch
                - ${{ghprbActualCommit}}
    builders:
      - github-notifier
      - shell: |
            #!/bin/bash -ex
            make ci
      - conditional-step:
          condition-kind: current-status
          condition-worst: SUCCESS
          condition-best: SUCCESS
          on-evaluation-failure: dont-run
          steps:
            - shell: |
                #!/bin/bash -ex
                make after_success
    publishers:
      - archive:
          artifacts: '{artifacts_path}'
          allow-empty: '{artifacts_empty}'
      - conditional-publisher:
          - condition-kind: '{execute_dependent_job}'
            on-evaluation-failure: dont-run
            action:
              - trigger-parameterized-builds:
                - project: '{dependent_job}'
                  current-parameters: true
                  predefined-parameters: |
                    UPSTREAM_ARTIFACT={artifacts_path}
                    UPSTREAM_BUILD=${{JOB_NAME}}
                    UPSTREAM_BUILD_NUMBER=${{build_number}}
                  condition: 'SUCCESS'
      - trigger-parameterized-builds:
          - project: '{name}-teardown'
            current-parameters: true
      - github-notifier


- job-group:
    name: '{name}-tests'
    jobs:
    - '{name}-provision'
    - '{name}-teardown'
    - '{name}-master-trigger'
    - '{name}-master-runtest'
    - '{name}-PR-trigger'
    - '{name}-PR-runtest'


- job:
    name: 'codec-rpm-rebuild-bdcs'
    node: master
    project-type: freestyle
    description: 'Rebuild bdcs after codec-rpm PR!'
    scm:
        - git:
            url: 'https://github.com/weldr/codec-rpm.git'
            refspec: +refs/pull/*:refs/remotes/origin/pr/*
            branches:
                # builds the commit hash instead of a branch
                - ${ghprbActualCommit}
    builders:
      - github-notifier
      - trigger-builds:
          - project: 'bdcs-master-trigger'
            block: true
            predefined-parameters: |
                UPSTREAM_ARTIFACT=${UPSTREAM_ARTIFACT}
                UPSTREAM_BUILD=${UPSTREAM_BUILD}
                UPSTREAM_BUILD_NUMBER=${UPSTREAM_BUILD_NUMBER}
    publishers:
      - github-notifier


- project:
    name: codec-rpm
    dependent_job: '{name}-rebuild-bdcs'
    execute_dependent_job: always
    artifacts_path: 'dist/{name}-latest.tar.gz'
    artifacts_empty: false
    jobs:
      - '{name}-tests'
Publishing artifacts
make after_success is responsible for creating a tarball if codec-rpm test suite
passed. This tarball gets uploaded as artifact into Jenkins and we can make use of it later!
Inside -master-runtest I have a conditional-step inside the builders section which
will copy the artifacts from the previous build if they are present. Notice that I copy
artifacts for a particular job number, which is the job for codec-rpm PR.
Making use of local artifacts is handled inside bdcs' make ci because it is
per-project specific and because I'd like to reuse my YAML templates.
Reporting statuses to GitHub
For github-notifier to be able to report statuses back to the pull request
the job needs to be configured with the git repository this pull request came from.
This is done by specifying the same scm section for all jobs that are related and
current-parameters: true to pass the revision information to the other jobs.
This also means that if I want to report status from codec-rpm-rebuild-bdcs then
it needs to be configured for the codec-rpm repository (see yaml) but somehow
it should trigger jobs for another repository!
When jobs are started via trigger-parameterized-builds their statuses are reported
separately to GitHub. When they are started via trigger-builds there should be only
one status reported.
Trigger chain for dependency rebuilds
With all of the above info we can now look at the codec-rpm-rebuild-bdcs job.
- It is configured for the codec-rpm repository so it will report its status to the PR
- It is conditionally started after
codec-rpm-PR-runtestfinishes successfully - It triggers
bdcs-master-triggerwhich in turn will rebuild & retest the bdcs component. Additional parameters specify whether we're going to use locally built artifacts or attempt to download then from Hackage - It uses
block: trueso that the status ofcodec-rpm-rebuild-bdcsis dependent on the status ofbdcs-master-runtest(everything in the job chain usesblock: truebecause of this)
How this looks like in practice
I have opened codec-rpm #39 to validate my configuration. The chain of jobs that gets executed in Jenkins is:
--- console.log for bdcs-master-runtest ---
Started by upstream project "bdcs-jslave-1-provision" build number 267
originally caused by:
 Started by upstream project "bdcs-master-trigger" build number 133
 originally caused by:
  Started by upstream project "codec-rpm-rebuild-bdcs" build number 25
  originally caused by:
   Started by upstream project "codec-rpm-PR-runtest" build number 77
   originally caused by:
    Started by upstream project "codec-rpm-jslave-1-provision" build number 178
    originally caused by:
     Started by upstream project "codec-rpm-PR-trigger" build number 118
     originally caused by:
      GitHub pull request #39 of commit b00c923065e367afd5b7a7cc068b049bb1ed25e1, no merge conflicts.
Statuses are reported on GitHub as follows:
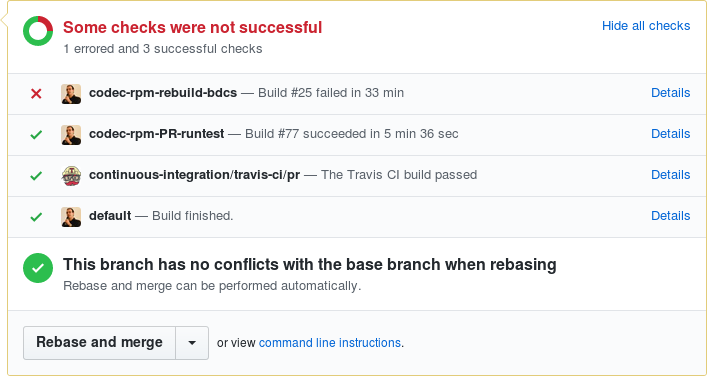
default is coming from the provisioning step and I think this is some sort of a bug
or misconfiguration of the provisioning job. We don't really care about this.
On the picture you can see that codec-rpm-PR-runtest was successful but
codec-rpm-rebuild-bdcs was not. The actual error when compiling bdcs is:
src/BDCS/Import/RPM.hs:110:24: error:
    * Couldn't match type `Entry' with `C8.ByteString'
      Expected type: conduit-1.2.13.1:Data.Conduit.Internal.Conduit.ConduitM
                       C8.ByteString
                       Data.Void.Void
                       Data.ContentStore.CsMonad
                       ([T.Text], [Maybe ObjectDigest])
        Actual type: conduit-1.2.13.1:Data.Conduit.Internal.Conduit.ConduitM
                       Entry
                       Data.Void.Void
                       Data.ContentStore.CsMonad
                       ([T.Text], [Maybe ObjectDigest])
    * In the second argument of `(.|)', namely
        `getZipConduit
           ((,) <$> ZipConduit filenames <*> ZipConduit digests)'
      In the second argument of `($)', namely
        `src
           .|
             getZipConduit
               ((,) <$> ZipConduit filenames <*> ZipConduit digests)'
      In the second argument of `($)', namely
        `runConduit
           $ src
               .|
                 getZipConduit
                   ((,) <$> ZipConduit filenames <*> ZipConduit digests)'
    |
110 |                     .| getZipConduit ((,) <$> ZipConduit filenames
    |                        ^^^^^^^^^^^^^^^^^^^^^^^^^^^^^^^^^^^^^^^^^^^...
That is because PR #39 changes the return type of Codec.RPM.Conduit::payloadContentsC
from Entry to C8.ByteString.
Thanks for reading and happy testing!
social image CC by https://pxhere.com/en/photo/226978
There are comments.
Introducing pylint-django 0.8.0
Since my previous post was about writing pylint plugins I figured I'd let you know that I've released pylint-django version 0.8.0 over the weekend. This release merges all pull requests which were pending till now so make sure to read the change log.
Starting with this release Colin Howe and myself are the new maintainers of this package. My immediate goal is to triage all of the open issue and figure out if they still reproduce. If yes try to come up with fixes for them or at least get the conversation going again.
My next goal is to integrate pylint-django with Kiwi TCMS and start resolving all the 4000+ errors and warnings that it produces.
You are welcome to contribute of course. I'm also interested in hosting a workshop on the topic of pylint plugins.
Thanks for reading and happy testing!
There are comments.
How to write pylint checker plugins
In this post I will walk you through the process of learning how to write additional checkers for pylint!
Prerequisites
-
Read Contributing to pylint to get basic knowledge of how to execute the test suite and how it is structured. Basically call
tox -e py36. Verify that all tests PASS locally! -
Read pylint's How To Guides, in particular the section about writing a new checker. A plugin is usually a Python module that registers a new checker.
-
Most of pylint checkers are AST based, meaning they operate on the abstract syntax tree of the source code. You will have to familiarize yourself with the AST node reference for the
astroidandastmodules. Pylint uses Astroid for parsing and augmenting the AST.NOTE: there is compact and excellent documentation provided by the Green Tree Snakes project. I would recommend the Meet the Nodes chapter.
Astroid also provides exhaustive documentation and node API reference.
WARNING: sometimes Astroid node class names don't match the ones from ast!
-
Your interactive shell weapons are
ast.dump(),ast.parse(),astroid.parse()andastroid.extract_node(). I use them inside an interactive Python shell to figure out how a piece of source code is parsed and converted back to AST nodes! You can also try this ast node pretty printer! I personally haven't used it.
How pylint processes the AST tree
Every checker class may include special methods with names
visit_xxx(self, node) and leave_xxx(self, node) where xxx is the lowercase
name of the node class (as defined by astroid). These methods are executed
automatically when the parser iterates over nodes of the respective type.
All of the magic happens inside such methods. They are responsible for collecting information about the context of specific statements or patterns that you wish to detect. The hard part is figuring out how to collect all the information you need because sometimes it can be spread across nodes of several different types (e.g. more complex code patterns).
There is a special decorator called @utils.check_messages. You have to list
all message ids that your visit_ or leave_ method will generate!
How to select message codes and IDs
One of the most unclear things for me is message codes. pylint docs say
The message-id should be a 5-digit number, prefixed with a message category. There are multiple message categories, these being
C,W,E,F,R, standing forConvention,Warning,Error,FatalandRefactoring. The rest of the 5 digits should not conflict with existing checkers and they should be consistent across the checker. For instance, the first two digits should not be different across the checker.
I'm usually having troubles with the numbering part so you will have to get creative or look at existing checker codes.
Practical example
In Kiwi TCMS there's legacy code that looks like this:
def add_cases(run_ids, case_ids):
    trs = TestRun.objects.filter(run_id__in=pre_process_ids(run_ids))
    tcs = TestCase.objects.filter(case_id__in=pre_process_ids(case_ids))

    for tr in trs.iterator():
        for tc in tcs.iterator():
            tr.add_case_run(case=tc)

    return
Notice the dangling return statement at the end! It is useless because when missing
the default return value of this function will still be None. So I've decided to
create a plugin for that.
Armed with the knowledge above I first try the ast parser in the console:
Python 3.6.3 (default, Oct  5 2017, 20:27:50)
[GCC 4.8.5 20150623 (Red Hat 4.8.5-11)] on linux
Type "help", "copyright", "credits" or "license" for more information.
>>> import ast
>>> import astroid
>>> ast.dump(ast.parse('def func():\n    return'))
"Module(body=[FunctionDef(name='func', args=arguments(args=[], vararg=None, kwonlyargs=[], kw_defaults=[], kwarg=None, defaults=[]), body=[Return(value=None)], decorator_list=[], returns=None)])"
>>>
>>>
>>> node = astroid.parse('def func():\n    return')
>>> node
<Module l.0 at 0x7f5b04621b38>
>>> node.body
[<FunctionDef.func l.1 at 0x7f5b046219e8>]
>>> node.body[0]
<FunctionDef.func l.1 at 0x7f5b046219e8>
>>> node.body[0].body
[<Return l.2 at 0x7f5b04621c18>]
As you can see there is a FunctionDef node representing the function and it has
a body attribute which is a list of all statements inside the function. The last
element is .body[-1] and it is of type Return! The Return node also has an
attribute called .value which is the return value! The complete code will look
like this:
import astroid

from pylint import checkers
from pylint import interfaces
from pylint.checkers import utils


class UselessReturnChecker(checkers.BaseChecker):
    __implements__ = interfaces.IAstroidChecker

    name = 'useless-return'

    msgs = {
        'R2119': ("Useless return at end of function or method",
                  'useless-return',
                  'Emitted when a bare return statement is found at the end of '
                  'function or method definition'
                  ),
        }


    @utils.check_messages('useless-return')
    def visit_functiondef(self, node):
        """
            Checks for presence of return statement at the end of a function
            "return" or "return None" are useless because None is the default
            return type if they are missing
        """
        # if the function has empty body then return
        if not node.body:
            return

        last = node.body[-1]
        if isinstance(last, astroid.Return):
            # e.g. "return"
            if last.value is None:
                self.add_message('useless-return', node=node)
            # e.g. "return None"
            elif isinstance(last.value, astroid.Const) and (last.value.value is None):
                self.add_message('useless-return', node=node)


def register(linter):
    """required method to auto register this checker"""
    linter.register_checker(UselessReturnChecker(linter))
Here's how to execute the new plugin:
$ PYTHONPATH=./myplugins pylint --load-plugins=uselessreturn tcms/xmlrpc/api/testrun.py | grep useless-return
W: 40, 0: Useless return at end of function or method (useless-return)
W:117, 0: Useless return at end of function or method (useless-return)
W:242, 0: Useless return at end of function or method (useless-return)
W:495, 0: Useless return at end of function or method (useless-return)
NOTES:
-
If you contribute this code upstream and pylint releases it you will get a traceback:
pylint.exceptions.InvalidMessageError: Message symbol 'useless-return' is already definedthis means your checker has been released in the latest version and you can drop the custom plugin!
-
This is example is fairly simple because the AST tree provides the information we need in a very handy way. Take a look at some of my other checkers to get a feeling of what a more complex checker looks like!
-
Write and run tests for your new checkers, especially if contributing upstream. Have in mind that the new checker will be executed against existing code and in combination with other checkers which could lead to some interesting results. I will leave the testing to yourself, all is written in the documentation.
This particular example I've contributed as PR #1821 which happened to contradict an existing checker. The update, raising warnings only when there's a single return statement in the function body, is PR #1823.
Workshop around the corner
I will be working together with HackSoft on an in-house workshop/training for writing pylint plugins. I'm also looking at reviving pylint-django so we can write more plugins specifically for Django based projects.
If you are interested in workshop and training on the topic let me know!
Thanks for reading and happy testing!
There are comments.
On Pytest-django and LiveServerTestCase with initial data
While working on Kiwi TCMS I've had the opportunity to learn in-depth about how the standard test case classes in Django work. This is a quick post about creating initial data and order of execution!
Initial test data for TransactionTestCase or LiveServerTestCase
class LiveServerTestCase(TransactionTestCase), as the name suggests, provides a running
Django instance during testing. We use that for Kiwi's XML-RPC API tests, issuing
http requests against the live server instance and examining the responses!
For testing to work we also need some initial data. There are few key items
that need to be taken into account to accomplish that:
self._fixture_teardown()- performs./manage.py flushwhich deletes all records from the database, including the ones created during initial migrations;self.serialized_rollback- when set to True will serialize initial records from the database into a string and then load this back. Required if subsequent tests need to have access to the records created during migrations!cls.setUpTestDatais an attribute ofclass TestCase(TransactionTestCase)and hence can't be used to create records before any transaction based test case is executed.self._fixture_setup()is where the serialized rollback happens, thus it can be used to create initial data for your tests!
In Kiwi TCMS all XML-RPC test classes have serialized_rollback = True and
implement a _fixture_setup() method instead of setUpTestData() to create the
necessary records before testing!
NOTE: you can also use fixtures in the above scenario but I don't like using them and we've deleted all fixtures from Kiwi TCMS a long time ago so I didn't feel like going back to that!
Order of test execution
From Django's docs:
In order to guarantee that all TestCase code starts with a clean database, the Django test runner reorders tests in the following way:
- All TestCase subclasses are run first.
- Then, all other Django-based tests (test cases based on SimpleTestCase, including TransactionTestCase) are run with no particular ordering guaranteed nor enforced among them.
- Then any other unittest.TestCase tests (including doctests) that may alter the database without restoring it to its original state are run.
This is not of much concern most of the time but becomes important when you decide
to mix and match transaction and non-transaction based tests into one test suite.
As seen in Job #471.1
tcms/xmlrpc/tests/test_serializer.py tests errored out! If you execute these tests
standalone they all pass! The root cause is that these serializer tests are based on
Django's test.TestCase class and are executed after a test.LiveServerTestCase class!
The tests in tcms/xmlrpc/tests/test_product.py will flush the database, removing all
records, including the ones from initial migrations. Then when test_serializer.py is
executed it will call its factories which in turn rely on initial records being available
and produces an error because these records have been deleted!
The reason for this is that pytest doesn't respect the order of execution for Django tests! As seen in the build log above tests are executed in the order in which they were discovered! My solution was not to use pytest (I don't need it for anything else)!
At the moment I'm dealing with strange errors/segmentation faults when running Kiwi's tests under Django 2.0. It looks like the http response has been closed before the client side tries to read it. Why this happens I have not been able to figure out yet. Expect another blog post when I do.
Thanks for reading and happy testing!
There are comments.
How to configure MTU for the Docker network
On one of my Jenkins slaves I've been experiencing problems when downloading
files from the network. In particular with cabal update which fetches data
from hackage.haskell.org. As suggested by David Roble the problem and solution
lies in the MTU configured for the default docker0 interface!
By default docker0 had MTU of 1500 which should be lower than the
host eth0 MTU of 1400! To configure this before the docker daemon is started
place any non-default settings in /etc/docker/daemon.json! For more information
head to
https://docs.docker.com/engine/userguide/networking/default_network/custom-docker0/.
Thanks for reading and happy testing!
There are comments.
4 Situational Leadership Styles
At SEETEST this year I visited only tracks related to management and leadership. The presentation How good leadership makes you a great team player by Jeroen Rosink was of particular interest to me. He talked about situational leadership.
 Image by Penn State University
According to Hersey & Blanchard each situation/person is different and it requires a leader or manager to adjust their style in order to be successful. In particular as a leader you have to approach each team, person and skill differently based on how developed they are. In this context a skill can be any technical or non-technical skill, a particular competence level required or anything really. The idea is that for ever item that we would like to develop we would go through the cycle shown on the image above.
Directing
Every new employee, team member, junior IT specialist starts with some directing. This is the phase where you tell people what they have to do and how to do it exactly. This is the phase of the almighty boss who provides the what, how, why, when and where!
In this phase an inexperienced(or new) person will figure out what is required of them and give them detailed steps of how to achieve it. Experienced team members will quickly find their bearings and transition out of this phase.
Coaching
In this phase the individual has already acquired some skills but they are not fully developed. In addition to tasks here we also focus at supporting the individual to improve their skills and deepen the connection and trust between them and the leader. This is the basis of creating strong commitment in the future.
Think about coaches of sport teams. What they do is give direction in order to create the best players/teams.
Supporting
This phase comes naturally after coaching. Here we can also make the parallel with sport teams. In this phase team members are already competent in their skills but somewhat inconsistent in their performance and not very committed to the end goal of the team (e.g. winning, testing all bugs, delivering software on time).
This is the phase in which shared decisions are taken (what to test, how we should test, how to split the tasks between team members) and in which teams are formed. Here a leader must focus less on the particular tasks and much more on the relationships within the group (don't forget the leader is also part of the group).
Delegating
This is the end phase in which we have individuals with strong skills and strong commitment. They are able to work and progress on their own. The job of the leader here is to monitor progress and still be part of some decisions. What I've seen people who I believe were delegating do is mostly reaffirm the decisions taken by the team.
In this phase there's no need for the leader to focus on tasks and relationship but rather high level goals and IMO providing opportunities for growth of each individual team member. This is the phase where future leaders will come from.
What that means for the team ?
Notice the smaller section in the image above titled Development Level! While an individual or a team is going through the different phases of leadership they also go through various stages of development. At the end of the cycle we get individuals with very strong skills and very strong commitment and work ethics.
What that means for the leader ?
(stats from presentation at the conference)
- 54% of leaders can use only 1 style
- 34% of leaders can use 2 styles
- 11% of leaders can use 3 styles
- 1% of leaders can use 4 styles
This means as leaders we have a lot to learn if we want to become effective. We have to learn to recognize at what stage of development an organization and/or a team is and what are the various stages of development of individual team members. Then apply this model as appropriate.
A side note: I am currently working with a group of young developers on an open source project where all of them are pretty much at the beginning of their journey. They lack almost all necessary technical skills that are needed to work on the project and their profiles, including age are very similar to one another. I believe this is an ideal situation to apply this model and see how it goes (expect results in a year or so).
Note2: I will have 2 more developers joining the same project a bit later and I expect one of them to be able to get up to speed faster (so far I have observed very impressive self-development in them) so that will spice things up a bit :)
Bonus question
Do you remember The 4 Basic Communication Styles post from last year? I have the feeling that these styles are very much related to the leadership strategies described above. For example Director is using the directing style, Expresser sounds a lot like a coach to me and Harmonizer is using the supporting style. Only a Thinker doesn't quite fit but on the other hand they can be quite self-driven and not need supervision.
I don't know if there's something here or I'm totally making things up. I'd love to get some insights from psychologists, leadership experts and communication experts.
Further reading
Here are a few basic articles to get you started
- https://online.stu.edu/situational-leadership/
- https://johnkwhitehead.ca/situational-leadership/
- http://www.leadership-central.com/situational-leadership-theory.html#axzz4y4I4vrZ7
Thanks for reading and happy testing (your leaderhip skills)!
There are comments.
Fallback to default values for NULL columns in Rust SQLite
I have been working on code which changed its DB schema to add a NULL column
without a default value! The standard row.get() from Rusqlite throws errors
because NULL is not a valid integer value.
The solution is to use row.get_checked() like so:
let build_id = row.get_checked(3).unwrap_or(0);
Interestingly enough I wasn't able to find clear information about this on the Internet so here it is.
Thanks for reading and happy hacking!
There are comments.
The ARCS model of motivational design

The ARCS model is an instructional design method developed by John Keller that focuses on motivation. ARCS is based on a research into best practices and successful teachers and gives you tactics on how to evaluate your lessons in order to build motivation right into them.
I have conducted and oversaw quite a few trainings and I have not been impressed with the success rate of those so this topic is very dear to me. Success for me measures in the ability to complete the training and learn the basis of a technical topic. And then gather the initial momentum to continue developing your skills within the chosen field. This is what I've been doing for myself and this is what I'd like to see my students do.
In his paper (I have a year 2000 printed copy from Cuba) Keller argues that motivation is a product of four factors: Attention, Relevance, Confidence and Satisfaction. You need all of them incorporated in your lessons and learning materials for them to be motivational. I could argue that you need the same characteristics at work in order to motivate people to do their job as you wish.
Once you start a lesson you need to grab the audience Attention so they can listen to you. Then the topic needs to be relevant to the audience so they will continue listening to the end. This makes for a good start but is not enough. Confidence means for the audience to feel confident they can perform all the necessary tasks on their own, that they have what it takes to learn (and you have to build that). If they think they can't make it from the start then it is a lost battle. And Satisfaction means the person feels that achievements are due to their own abilities and hard work not due to external factors (work not demanding enough, luck, etc).
If all of the above 4 factors are true then the audience should feel personally motivated to learn because they can clearly understand the benefit for themselves and they realize that everything depends on them.
ARCS gives you a model to evaluate your target audience and lesson properties and figure out tactics by which to address any shortcomings in the above 4 areas.
Last Friday I hosted 2 training sessions: a Python and Selenium workshop at HackConf and then a lecture about test case management and demo of Kiwi TCMS before students at Pragmatic IT academy. For both of them I used the simplified ARCS evaluation matrix.
In this matrix the columns map to the ARCS areas while the rows map to different parts of the lesson: audience, presentation media, exercise, etc. Here's how I used them (I've mostly analyzed the audience).
Python & Selenium workshop
- Attention
- (+) this is an elective workshop
- (+) the topic is clear and the curricula is on GitHub
- (+) the title is catchy (Learn Python & Selenium in 6 hours)
- (+) I am well known in the industry
- Relevance
- (+) Basic Python practical skills, being able to write small programs, knowing the basic building blocks
- (+) Basic Selenium skills: finding and using elements
- (+) Basic Python test automation skills: writing simple tests and asserts
- Confidence
- (+) each task has tests which need to report PASS at the end
- (-) need to use PyCharm IDE, unfamiliar with IDEs
- (-) not enough experience with programming or Linux
- (-) not enough experience with (automation) testing
- (-) all materials and exercises are in English
- Satisfaction
- (-) not being able to create a simple program
From the above it was clear that I didn't need to spend much time on building attention or relevance. The topic itself and the fact that these are skill which can be immediately applied at work gave the workshop a huge boost. During the opening part of my workshop I've stated "this training takes around 2 months, I've seen some of you forking my GitHub repo so I know you are prepared. Let's see how much you can do in 6 hours" which sets the challenge and was my attention building moment. Then I reiterated that all skills are directly applicable in daily work confirming the relevance part.
I did need a confidence building strategy though. So having all the tests ready meant evaluation was quick and easy. Anton (my assistant) and I promised to help with the IDE and all other questions to counter the other items on the list. During the course of the workshop I did quick code review of all participants that managed to complete their tasks within the hour giving them quick tips on how to perform or highlighting pieces of code/approaches that were different from mine or that I found elegant or interesting. This was my confidence building strategy. Code review and verbal praising also touches on the satisfaction area, i.e. the participant gets the feeling they are doing well.
My Satisfaction building strategy was kind of mixed. Before I read about ARCS I wanted to give penalty points to participants who didn't complete on time and then send them home after 3 fails. At the end I only said I will do this but didn't do it.
Instead I used the challenge statement from the attention phase and turned that into a competition. The first 3 participants to complete their module tasks on time were rewarded chocolates. With the agreement of the entire group the grand prize was set to be a small box of the same chocolates and this would be awarded to the person with the most chocolates (e.g. the one who's been in top 3 the most times).
Bistra is our winner. 4/5 times in top 3 #Python #Selenium #testing #HC17 pic.twitter.com/vXrPhElbbW
— Alexander Todorov (@atodorov_) September 29, 2017
I don't know if ARCS had anything to do with it but this workshop was the most successful training I've ever done. 40% of the participants managed to get at least one chocolate and at least 50% have completed all of their tasks within the hour. Normally a passing rate on such training is around 10 to 20 %.
During the workshop we had 5 different modules which consisted of 10-15 minutes explanation of Python basics (e.g. loops or if conditions), quick Q&A session and around 30 minutes for working alone and code review. I don't think I was following ARCS for each of the separate modules because I didn't have time to analyze them individually. I gambled all my money on the introductory 10 minutes!
TCMS lecture
My second lecture for the day was about test case management. The audience was students who are aspiring to become software testers and attending the Software Testing training at Pragmatic. In my lecture (around 1 hour) I wanted to explain what test management is, why it is important and also demo the tool I'm working on - Kiwi TCMS. The analysis looks like:
- Attention
- (+) the entire training was elective but
- (-) that particular lecture was mandatory. Students were not able to select what they are going to study
- Relevance
- (-) it may not be clear what TCMS is and why we need it
- (+) however students may sense that this is something work related since the entire training is
- Confidence
- (-) unknown UI, generally unfamiliar workflow
- (-) not enough knowledge how to write a Test Plan document or test cases
- Satisfaction
- (-) how to make sure new skills can be applied in practice
So I was in a medium need of a strategy to build attention. My opening was by introducing myself to establish my professional level and introducing Kiwi TCMS by saying it is the best open source test case management system to which I'm one of the core maintainers.
Then I had a medium need of a relevance building strategy. I did this by explaining what test management is and why it is important. I've talked briefly about QA managers trying to indirectly inspire the audience to aim for this position. I finished this part by telling the students how a TCMS system helps the ordinary guy in their daily work - namely by giving you a dashboard where you can monitor all the work you need to do, check your progress, etc.
I was in a strong need to build confidence. I did a 20-30 minutes demonstration where I was writing a Test Plan and test cases and then pretending to execute them and marking bugs and test results in the system. I told the students "you are my boss for today, tell me what I need to test". So they instructed me to test the login functionality of the system and we agreed on 5 different test cases. I described all of these into Kiwi TCMS and began executing them. During execution I opened another browser window and did exactly what the test case steps were asking for. There were some bugs so I promptly marked them as such and I promised I will fix them.
To build satisfaction I was planning on having the students write one test plan and some test cases but we didn't have time for this. Their instructor promised they will be doing more exercises and using Kiwi TCMS in the next 2 months but this remains to be seen. I've wrapped my lecture by giving advise to use Kiwi TCMS as a portfolio building tool. Since these students are newcomers to the QA industry their next priority will be looking for a job. I've advised them to document their test plans and test cases into Kiwi TCMS and then present these artifacts to future employers. I've also told them they are more than welcome to test and report bugs against Kiwi TCMS on GitHub and add these bugs to their portfolio!
This is how I've applied ARCS for the first time. I like it and will continue to use it for my trainings and workshops. I will try harder to make the application process more iterative and apply the method not only to my opening speech but for all submodules as well!
One thing that bothers me is can I apply the ARCS principles when doing a technical presentation and how do they play together or clash with storytelling, communication style and rhetoric (all topics I'm exploring for my public speaking). If you do have more experience with these please share it in the comments below.
Thanks for reading and happy testing!
There are comments.
Storytelling for test professionals
This is a very condensed brief of an 8 hour workshop I visited earlier this year held by Huib Schoots. You can find the slides here.
Storytelling is the form in which people naturally communicate. Understanding the building blocks of a story will help us understand other people's motivations, serve as map for actions and emotions, help uncover unknown perspectives and serve as source for inspiration.
Stories stand on their own and have a beginning, middle and an end. There is a main character and a storyline with development. Stories are authentic and personal and often provocative and evoke emotions.
7 basic story plots
- Overcoming the Monster
- Rags to Riches
- The Quest
- Voyage and return
- Comedy
- Tragedy
- Rebirth
From these we can derive the following types of stories.
6 types of stories
- Who am I (identity stories)
- Why am I here (motive and mission stories)
- Vision stories (the big picture)
- Future scenarios (imagining the future)
- Product stories (branding)
- Culture stories (a sum of other stories)
12 Common Archetypes
Each story needs a hero and there are 12 common archetypes of heroes. More importantly you can also find these archetypes within your team and organization. Read the link above to find out what their motto, core desire, goals, fears and motives are. The 12 types are
- Innocent
- Everyman
- Hero
- Caregiver
- Explorer
- Rebel
- Lover
- Creator
- Jester
- Sage
- Magician
- Ruler
6 key elements of a story
- Who's the hero?
- What is their desire?
- What is stopping them?
- What is the turning point?
- What are their insights?
- What is the solution?
Dramatic structure and Freytag's pyramid

One of the most commonly used storytelling structures is the Freytag's Pyramid. According to it each story has an exposition, rising action, climax, falling action and resolution. I think this can be applied directly when preparing presentations even technical ones.
The Hero's journey
Successful stories follow the 12 steps of the hero's journey
- Ordinary world
- Call to adventure
- Refusal of the Call
- Meeting the mentor
- Crossing the threshold (after which the hero enters the Special world)
- Tests, allies and enemies
- Approach
- Ordeal, death & rebirth
- Rewards, seizing the sword
- The road back (to the ordinary world)
- Resurrection
- Return with elixir
As part of the workshop we worked in groups and created a completely made up story. Every person in the group was contributing couple of sentences from their own experiences, trying to describe the particular step in the hero's journey. At the end we told a story from the point of view of a single hero which was a complete mash-up of moments that had nothing to do with each other. Still it sounded very realistic and plausible.
Storytelling techniques
SUCCESS means Simple, Unexpected, Concrete, Credible, Emotional, Stories. To use this technique find the core of your idea, grab people's attention by surprising them and make sure the idea can be understood and remembered later. Find a way to make people believe in the idea so they can test it for themselves, make them feel something to understand why this idea is important. Tell stories and empower people to use an idea through narrative.
STAR means Something They will Always Remember. A STAR Moment should be Simple, Transferable, Audience-centered, Repeatable, and Meaningful. There are 5 types of STAR moments: memorable dramatization, repeatable sound bites, evocative visuals, emotive storytelling, shocking statistics.
To enhance our stories and presentations we should appeal to senses (smell, sounds, sight, touch, taste) and make it visual.
I will be using some of these techniques combined with others in my future presentations and workshops. I'd love to be able to summarize all of them into a short guide targeted at IT professionals but I don't know if this is even possible.
Anyway if you do try some of these techniques in your public speaking please let me know how it goes. I want to hear what works for you and your audience and what doesn't.
Thanks for reading and happy testing!
There are comments.
More tests for login forms

By now I probably have documented more test cases for login forms than anyone else. You can check out my previous posts on the topic here and here. I give you a few more examples.
Test 01 and 02: First of all let's start by saying that a "Remember me" checkbox should actually remember the user and login them automatically on the next visit if checked. The other way around if not checked. I don't think this has been mentioned previously!
Test 03: When there is a "Remember me" checkbox it should be selectable both with the mouse and the keyboard. On my.telenor.bg the checkbox changes its image only when clicked with the mouse. Also clicking the login button with Space doesn't work!
Interestingly enough when I don't select "Remember me" at all and close then revisit the page I am still able to access the internal pages of my account! At this point I'm not quite sure what this checkbox does!
Test 04: Testing two factor authentication. I had the case where GitHub SMS didn't arrive for over 24 hrs and I wasn't able to login. After requesting a new code you can see the UI updating but I didn't receive another message. In this particular case I received only one message with an already invalid code. So test for:
- how long does it take for the codes to expire
- is there a visual feedback indicating how many codes have been requested
- do latest code invalidates all the previous ones or all that have been unused still work
- what happens if I'm already logged in and somebody tries to access my account requesting additional codes which may or may not invalidate my login session?
Test 05: Check that confirmation codes, links, etc will actually expire after their configured time. Kiwi TCMS had this problem which has been fixed in version 3.32.
Test 06: Is this a social-network-login only site? Then which of my profiles did I use? Check that there is a working social auth provider reminder.
Test 07: Check that there is an error message visible (e.g. wrong login credentials). After the redesign Kiwi TCMS had stopped displaying this message and instead presents the user with the login form again!
Also checkout these testing challenges by Claudiu Draghia where you can see many cases related to input field validation! For example empty field, value too long, special characters in field, etc. All of these can lead to issues depending on how login is implemented.
Thanks for reading and happy testing!
There are comments.
Xiaomi's selfie bug
Recently I've been exploring the user interface of a Xiaomi Redmi Note 4X phone and noticed a peculiar bug, adding to my collection of obscure phone bugs. Sometimes when taking selfies the images will not be saved in the correct orientation. Instead they will be saved as if looking in the mirror and this is a bug!

While taking the selfie the display correctly acts as a mirror, see my personal Samsung S5 (black) and the Xiaomi device (white).

However when the image is saved and then viewed through the gallery application there is a difference. The image below is taken with the Xiaomi device and there have been no effects added to it except scaling and cropping. As you can see the letters on the cereal box are mirrored!

The symptoms of the bug are not quite clear as of yet. I've managed to reproduce at around 50% rate so far. I've tried taking pictures during the day in direct sunlight and in the shade, also in the evening under bad artificial lighting. Taking photo of a child's face and then child plus varying number of adults. Then photo of only 1 or more adults, heck I even made a picture of myself. I though that lighting or the number of faces and their age have something to do with this bug but so far I'm not getting consistent results. Sometimes the images turn out OK and other times they don't regardless of what I take a picture of.
I also took a picture of the same cereal box, under the same conditions as above but not capturing the child's face and the image came out not mirrored. The only clue that seems to hold true so far is that you need to have people's faces in the picture for this bug to reproduce but that isn't an edge case when taking selfies, right?
I've also compared the results with my Samsung S5 (Android version 6.0.1) and BlackBerry Z10 devices and both work as expected: while taking the picture the display acts as a mirror but when viewing the saved image it appears in normal orientation. On S5 there is also a clearly visible "Processing" progress bar while the picture is being saved!
For reference the system information is below:
Model number: Redmi Note 4X
Android version: 6.0 MRA58K
Android security patch level: 2017-03-01
Kernel version: 3.18.22+
I'd love if somebody from Xiaomi's engineering department looks into this and sends me a root cause analysis of the problem.
Thanks for reading and happy testing! Oh and btw this is my breakfast, not hers!
There are comments.
Speeding up Rust builds inside Docker
Currently it is not possible
to instruct cargo, the Rust package manager, to build only the dependencies
of the software you are compiling! This means you can't easily pre-install
build dependencies. Luckily you can workaround this with cargo build -p!
I've been using this Python script to parse Cargo.toml:
#!/usr/bin/env python

from __future__ import print_function

import os
import toml

_pwd = os.path.dirname(os.path.abspath(__file__))
cargo = toml.loads(open(os.path.join(_pwd, 'Cargo.toml'), 'r').read())

for section in ['dependencies', 'dev-dependencies']:
    for dep, version in cargo[section].items():
        print('cargo build -p %s' % dep)
and then inside my Dockerfile:
RUN mkdir /bdcs-api-rs/
COPY parse-cargo-toml.py /bdcs-api-rs/

# Manually install cargo dependencies before building
# so we can have a reusable intermediate container.
# This workaround is needed until cargo can do this by itself:
# https://github.com/rust-lang/cargo/issues/2644
# https://github.com/rust-lang/cargo/pull/3567
COPY Cargo.toml /bdcs-api-rs/
WORKDIR /bdcs-api-rs/
RUN python ./parse-cargo-toml.py | while read cmd; do \
        $cmd;                                    \
    done
It doesn't take into account the version constraints specified in Cargo.toml but
is still able to produce an intermediate docker layer which I can use to
speed-up my tests by caching the dependency compilation part.
As seen in the build log,
lines 1173-1182, when doing cargo build it downloads and compiles chrono v0.3.0 and
toml v0.3.2. The rest of the dependencies are already available. The logs also show
that after Job #285 the build times dropped from 16 minutes down to 3-4 minutes due to
Docker caching. This would be even less if the cache is kept locally!
Thanks for reading and happy testing!
There are comments.
Code coverage from Nightmare.js tests
In this article I'm going to walk you through the steps required to collect code coverage when running an end-to-end test suite against a React.js application.
The application under test looks like this
<!doctype html>
<html lang="en-us" class="layout-pf layout-pf-fixed">
  <head>
    <!-- js dependencies skipped -->
  </head>
  <body>
    <div id="main"></div>
    <script src="./dist/main.js?0ca4cedf3884d3943762"></script>
  </body>
</html>
It is served as an index.html file and a main.js file which intercepts
all interactions from the user and sends requests to the backend API when
needed.
There is an existing unit-test suite which loads the individual components and tests them in isolation. Apparently people do this!
There is also an end-to-end test suite which does the majority of the testing. It fires up a browser instance and interacts with the application. Everything runs inside Docker containers providing a full-blown production-like environment. They look like this
test('should switch to Edit Recipe page - recipe creation success', (done) => {
  const nightmare = new Nightmare();
  nightmare
    .goto(recipesPage.url)
    .wait(recipesPage.btnCreateRecipe)
    .click(recipesPage.btnCreateRecipe)
    .wait(page => document.querySelector(page.dialogRootElement).style.display === 'block'
      , createRecipePage)
    .insert(createRecipePage.inputName, createRecipePage.varRecName)
    .insert(createRecipePage.inputDescription, createRecipePage.varRecDesc)
    .click(createRecipePage.btnSave)
    .wait(editRecipePage.componentListItemRootElement)
    .exists(editRecipePage.componentListItemRootElement)
    .end() // remove this!
    .then((element) => {
      expect(element).toBe(true);
      // here goes coverage collection helper
      done(); // remove this!
    });
}, timeout);
The browser interaction is handled by Nightmare.js (sort of like Selenium) and the test runner is Jest.
Code instrumentation
The first thing we need is to instrument the application code to provide coverage
statistics. This is done via babel-plugin-istanbul. Because unit-tests are
executed a bit differently we want to enable conditional instrumentation. In reality
for unit tests we use jest --coverage which enables istanbul on the fly and having
the code already instrumented breaks this. So I have the following in webpack.config.js
if (process.argv.includes('--with-coverage')) {
  babelConfig.plugins.push('istanbul');
}
and then build my application with node run build --with-coverage.
You can execute node run start --with-coverage, open the JavaScript console
in your browser and inspect the window.__coverage__ variable. If this is defined
then the application is instrumented correctly.
Fetching coverage information from within the tests
Remember that main.js from the beginning of this post? It lives inside index.html
which means everything gets downloaded to the client side and executed there.
When running the end-to-end test suite that is the browser instance which is controlled
via Nightmare. You have to pass window.__coverage__ from the browser scope back to
nodejs scope via nightmare.evaluate()! I opted to directly save the coverage data
on the file system and make it available to coverage reporting tools later!
My coverage collecting snippet looks like this
nightmare
  .evaluate(() => window.__coverage__) // this executes in browser scope
  .end() // terminate the Electron (browser) process
  .then((cov) => {
    // this executes in Node scope
    // handle the data passed back to us from browser scope
    const strCoverage = JSON.stringify(cov);
    const hash = require('crypto').createHmac('sha256', '')
      .update(strCoverage)
      .digest('hex');
    const fileName = `/tmp/coverage-${hash}.json`;
    require('fs').writeFileSync(fileName, strCoverage);

    done(); // the callback from the test
  })
.catch(err => console.log(err));
Nightmare returns window.__coverage__ from browser scope back to nodejs scope
and we save it under /tmp using a hash value of the coverage data as the file
name.
Side note: I do have about 40% less coverage files than number of test cases. This means some test scenarios exercise the same code paths. Storing the individual coverage reports under a hashed file name makes this very easy to see!
Note that in my coverage handling code I also call .end() which will terminate
the browser instance and also execute the done() callback which is being passed
as parameter to the test above! This is important because it means we had to update
the way tests were written. In particular the Nightmare method sequence doesn't
have to call .end() and done() except in the coverage handling code. The
coverage helper must be the last code executed inside the body of the last
.then() method. This is usually after all assertions (expectations) have been met!
Now this coverage helper needs to be part of every single test case so I
wanted it to be a one line function, easy to copy&paste! All my attempts to
move this code inside a module have been futile. I can get the module loaded
but it kept failing with
Unhandled promise rejection (rejection id: 1): cov_23rlop1885 is not defined;`
At the end I've resorted to this simple hack
eval(fs.readFileSync('utils/coverage.js').toString());
Shout-out to Krasimir Tsonev who joined me on a two days pairing session to figure this stuff out. Too bad we couldn't quite figure it out. If you do please send me a pull request!
Reporting the results
All of these coverage-*.json files are directly consumable by nyc - the
coverage reporting tool that comes with the Istanbul suite! I mounted
.nyc_output/ directly under /tmp inside my Docker container so I could
nyc report
nyc report --reporter=lcov | codecov
We can also modify the unit-test command to
jest --coverage --coverageReporters json --coverageDirectory .nyc_output so it
produces a coverage-final.json file for nyc. Use this if you want to combine
the coverage reports from both test suites.
Because I'm using Travis CI the two test suites are executed independently and there is no easy way to share information between them. Instead I've switched from Coveralls to CodeCov which is smart enough to merge coverage submissions coming from multiple jobs on the same git commits. You can compare the commit submitting only unit-test results with the one submitting coverage from both test suites.
All of the above steps are put into practice in PR #136 if you want to check them out!
Thanks for reading and happy testing!
There are comments.
Faster Travis CI tests with Docker cache
For a while now I've been running tests on Travis CI using Docker containers to build the project and execute the tests inside. In this post I will explain how to speed up execution times.
A Docker image is a filesystem snapshot similar to a virtual machine
image. From these images we build containers (e.g. we run the container X
from the image Y). The construction of Docker images is controlled via
Dockerfile which contains a set of instructions how to build the image.
For example:
FROM welder/web-nodejs:latest
MAINTAINER Brian C. Lane <bcl@redhat.com>
RUN dnf install -y nginx

CMD nginx -g "daemon off;"
EXPOSE 3000

## Do the things more likely to change below here. ##

COPY ./docker/nginx.conf /etc/nginx/

# Update node dependencies only if they have changed
COPY ./package.json /welder/package.json
RUN cd /welder/ && npm install

# Copy the rest of the UI files over and compile them
COPY . /welder/
RUN cd /welder/ && node run build

COPY entrypoint.sh /usr/local/bin/entrypoint.sh
ENTRYPOINT ["/usr/local/bin/entrypoint.sh"]
docker build is smart enough to actually build intermediate layers for each
command and store them on your computer. Each command is hashed and it is rebuilt
only if it has been changed. Thus the stuff which doesn't change often goes first
(like setting up a web server or a DB) and the stuff that changes (like the project source code)
goes at the end. All of this is beautifully explained by Stefan Kanev in
this video (in Bulgarian).
Travis and Docker
While intermediate layer caching is a standard feature for Docker it is disabled by default in Travis CI and any other CI service I was able to find. To be frank Circles CI offer this as a premium feature but their pricing plans on that aren't clear at all.
However you can enable the use of caching following a few simple steps:
- Make your Docker images publicly available (e.g. Docker Hub or Amazon EC2 Container Service)
- Before starting the test job do a
docker pull my/image:latest - When building your Docker images in Travis add
--cache-from my/image:latesttodocker build - After successful execution
docker tagthe latest image with the build job number anddocker pushit again to the hub!
NOTES:
- Everything you do will become public so take care not to expose internal code. Alternatively you may configure a private docker registry (e.g. Amazon EC2 CS) and use encrypted passwords for Travis to access your images;
docker pullwill download all layers that it needs. If your hosting is slow this will negatively impact execution times;docker pushwill upload only the layers that have been changed;- I only push images coming from the master branch which are not from a pull request build job. This prevents me from accidentally messing something up.
If you examine the logs of Job #247.4 and Job #254.4 you will notice that almost all intermediate layers were re-used from cache:
Step 3/12 : RUN dnf install -y nginx
 ---> Using cache
 ---> 25311f052381
Step 4/12 : CMD nginx -g "daemon off;"
 ---> Using cache
 ---> 858606811c85
Step 5/12 : EXPOSE 3000
 ---> Using cache
 ---> d778cbbe0758
Step 6/12 : COPY ./docker/nginx.conf /etc/nginx/
 ---> Using cache
 ---> 56bfa3fa4741
Step 7/12 : COPY ./package.json /welder/package.json
 ---> Using cache
 ---> 929f20da0fc1
Step 8/12 : RUN cd /welder/ && npm install
 ---> Using cache
 ---> 68a30a4aa5c6
Here the slowest operations are dnf install and npm install which on normal execution
will take around 5 minutes.
You can check-out my .travis.yml for more info.
First time cache
It is important to note that you need to have your docker images available in the
registry before you execute the first docker pull from CI. I do this by manually building
the images on my computer and uploading them before configuring CI integration. Afterwards
the CI system takes care of updating the images for me.
Initially you may not notice a significant improvement as seen in Job #262, Step 18/22. The initial image available on Docker Hub has all the build dependencies installed and the code has not been changed when job #262 was executed.
The COPY command copies the entire contents of the directory, including filesystem metadata!
Things like uid/gid (file ownership), timestamps (not sure if taken into account)
and/or extended attributes (e.g. SELinux)
will cause the intermediate layers checksums to differ even though the actual
source code didn't change. This will resolve itself once your CI system starts automatically
pushing the latest images to the registry.
Thanks for reading and happy testing!
There are comments.
Page 1 / 16